I’ll be the first to admit the expression “cloud computing” is overly abused these days. The reality is, while a bit abused by marketing types, cloud computing is a huge deal for developers. Gamers simply expect certain functionality in your game that eventually is going to require you to have a server side component. You may think to yourself… well, rolling my own server isn’t all that difficult. If you have the skill set to do so, creating say… a server side score board is not all that difficult. Frankly, it isn’t either, in fact I covered exactly that topic in a prior tutorial series. Easy, right? Ok… now where are you going to host it and what is that going to cost you? How secure is it? Is it encrypted? How well does it scale? What about back-ups and fault tolerance? Who is going to administrate your servers? What about reporting? Suddenly this simple little task quickly becomes a much more costly and complicated process and takes time and money away from doing what you set out to do… actually developing a game.
At the end of the day, for many developers letting someone else take care of all of these things generally makes a lot of sense. This is the exact problem that Scoreoid sets out to solve. You can essentially think of them as a your game’s server in the cloud. Using a fairly simple REST based api you can easily accomplish pretty much anything you could want from a dedicated server and they take care of the infrastructure and day to day operation for you. In this post we are going to take a closer look at how Scoreoid works and what it does for you.
From a developers perspective, Scoreoid can be thought of as a product in two parts. First you have the developer portal/dashboard where you can monitor, access and maintain your data. Then you have the REST based API that the programmer uses to work with Scoreoid.
WARNING TIME!
To illustrate the various abilities I put together a web application that demonstrates much of Scoreoid’s functionality. This application is hitting live data and you the viewers have the ability to update and create new data. This means I have NO IDEA what you might encounter when using the application and take no responsibility for anything written. Please guys, be mature about it. If you see something hateful or excessively stupid, let me know and I will remove it.
The Scoreoid Dashboard
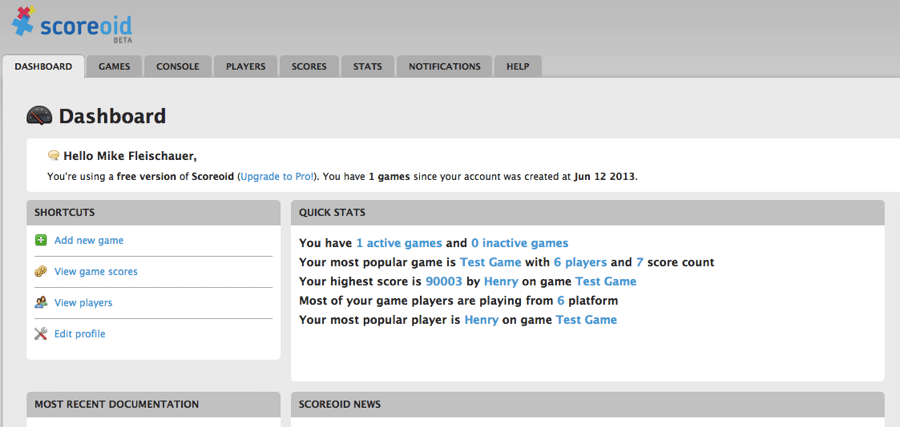
First let’s take a quick look at the Scoreoid web interface. If you haven’t already, you need to sign up for a Scoreoid account. Don’t worry, it’s completely free and they don’t spam you with emails. Once you are signed up, log in and you will arrive at the main Dashboard page:
Here you get a top level overview of activity for your game. In this case you can see that Henry is a very prolific and talented player of Test Game!
Across the top are a series of tabs. These provide you a way to drill down into data for each category, for example, below is the result of clicking the Player tab.
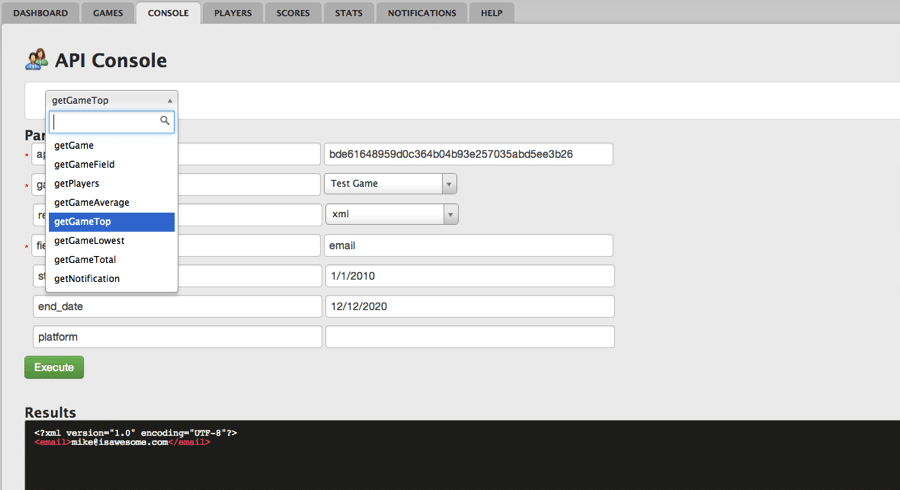
Here you can modify or delete any value in the Players database. Scores, Games, Stats and Notifications work similarly, allowing you to access and modify data using a graphic interface. The one I didn’t mention was Console, and this is a handy little tool. Console allows you to make Scoreoid API calls using a form.
Using the Console you pick the API call to make, and the form below is populated with the available parameter fields. Once you execute it, you see the results below in the results panel, in either XML or JSON format. You can make use of the entire Scoreoid API using the console.
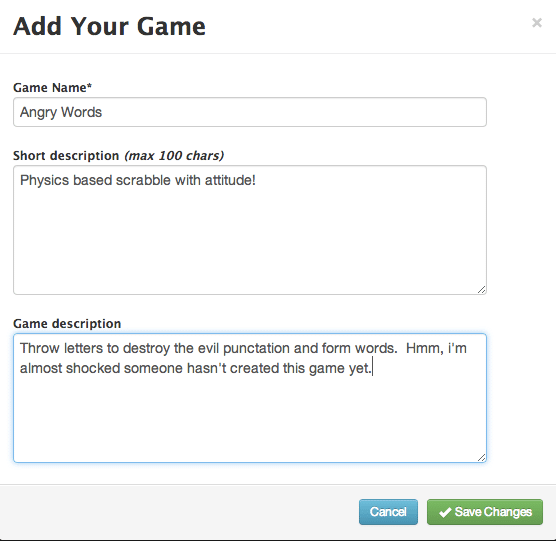
Finally, let’s take a look at adding a game. Click on the Game tab and click the Add New Game button. You need at least one game to use Scoreoid, but you can of course make many if you wish. You pass the Game ID as a parameter to a number of the API calls. Creating a game is simple enough:
Finally the Help link brings you to the documentation. You can access the documentation without the need to log in if you want to take a look at the API. The documentation is complete and has examples in multiple languages for each API call. Now, let’s get down to some coding.
Programming with Scoreoid
Scoreoid is accessed using a REST based interface. The nice part about a REST based api is, if your application can programmatically access the web, it can use the API. The actual programming language you use doesn’t matter. In this example, I am going to mostly use JavaScript. In my case I like working with the YUI library, but you can easily use whatever library you want, the methodology stays very similar although the syntax changes slightly.
There are a couple things to note up front. In the name of keeping the code easy to understand, I’ve performed a couple programming no-no’s in this example. First I gave you all access to my Scoreoid token… in your application you obviously would not want to do this. If you create a JavaScript based Scoreoid application, be sure to read about using an auto generated proxy for securing your application. Next, I used the HTTP calls instead of the HTTPS ones. In a secured application, you would want to obviously use the encrypted option. Finally I made only synchronous networking calls… this means my networking calls cause programming execution to stop until results are returned. In a real application you would generally want to make asynchronous calls. As a result of these decisions, the code should however be fairly easy to understand.
Let’s jump right in to the sample app. We will be looking at portions of the code as we go. However a great deal of the code has nothing to do with Scoreoid in particular ( YUI3 or markup related code ), while a lot of it is very repetitious in nature. Therefore instead of listing it all here, I created a github for it. You can also download a zip of the project here.
The application requires a server to be run due to the AJAX calls. Therefore I have included a simple Node based server. If you have Node installed, you can run the application by typing:
node server.js
Then you can access it in your browser at http://localhost:3000. The vast majority of interesting code for this application is in the views folder, while the templates folder contains the markup. Again, keep in mind this application is working with live data, so play around, but please be mature about it:
( Below is the application, not a screen shot 🙂 )
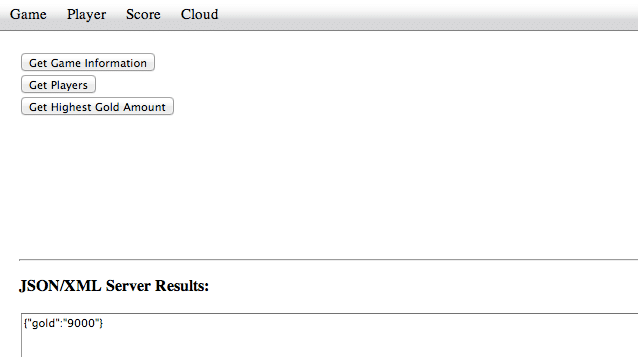
There is a tab for each area of functionality we want to look at, Game, Player, Score and Cloud. Under each is a form for interacting with Scoreoid. At the bottom of each form is a field showing the raw XML or JSON results returned by the server.
Before we continue too far, let’s take a quick look inside Index.html at the following lines.
These are two values we will be needing over and over again. First is my Scoreoid token… you should KEEP YOURS PRIVATE! The second is the ID of a game I created earlier using the dashboard. Once again, Scoreoid can support multiple games at once, but in this case I am using only one. So in the code when you see Y.SCOREOID_KEY and Y.GAME_ID, this is where those values are set.
Now let’s take a look at the Game tab in the application:
First we will look at the code that executes when the user clicks the Get Game Information button in game.View.js.
Y.io() is what you use to make a HTTP request in YUI3. The data object within the requestCfg object is where you pass the parameters to Scoreoid. We pass in our api_key, game_id ( both defined earlier in index.html) as well as response. The response variable tells Scoreoid what format you want the results returned in, either JSON or XML. For the vast majority of examples, we are going to go with JSON as it’s a bit easier to read and lighter weight. Finally you call the function in the form of the URL you pass to Y.io, in this case http://api.scoreoid.com/v1/getGame which calls the getGame() method. There is a wiki page for every API call ( here is getGame for example ), that lists the possible parameter fields as well as the values that will be returned.
Click the button and in the results area you should see:
[{“Game”:{“user_id”:”51b8b1dcfd8978203e000b9d”,”name”:”Test Game”,”short_description”:”This game is so amazingly awesome, it doesn’t exist!”,”description”:”Really, it doesn’t exist. The game is a lie.”,”players_count”:6,”scores_count”:7,”status”:1,”created”:”2013-06-12 19:39:07″,”updated”:”2013-06-12 19:39:07″}}]
This is the return value of getGame() in JSON format. JSON is a handy format, as it is basically just a JavaScript object encoded in string from. You can turn a JavaScript object into JSON by calling JSON.stringify(myObject) and you can turn a JSON string back into a JavaScript object by calling JSON.parse(myString). Pretty much every programming language under the sun has a JSON parsing library. For those that don’t you can always get Scoreoid to return XML ( we look at an XML example later ).
If YUI calling convention is alien to you, and you are more comfortable using jQuery, you can make the above call using the following jQuery code:
$.post(“http://api.scoreoid.com/v1/getGame”, { api_key:Y.SCOREOID_KEY,game_id:Y.GAME_ID,response:“JSON”},
function(response) {
//response will now contain the JSON data returned by Scoreoid
//note, this is an async call
});
As you can see, it’s pretty simple to make REST based calls. The other two examples in the Game tab are Get Players and Get Highest Gold Amount. Below is the code for GetPlayers:
As you can see the code is basically identical, the only difference is you call a different URL. getPlayers() returns a list of all of the players of your game, unless of course you tell it to limit the results returned. Get Highest Gold Amount is also virtually identical:
Once again, we call a different URL. In this case we are also passing in an additional parameter field. Field tells the method which value we want to get the highest value of when calling getGameTop. As you can see when we called getGameTop(), the value that was passed in was gold.

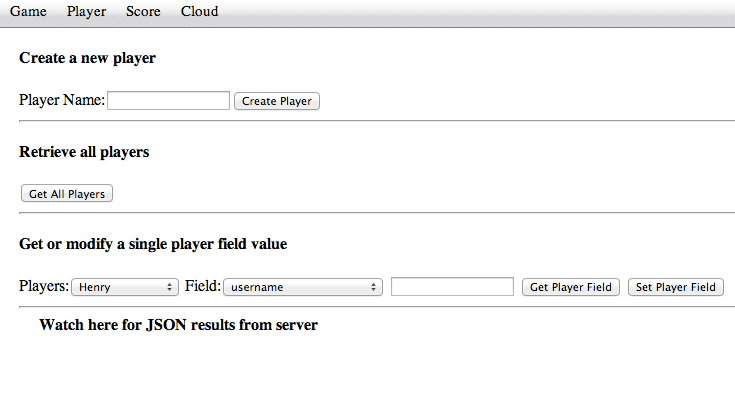
This simply gets the value of the playerName text field ( see player.Template in the templates folder for HTML markup ) and passes it to the function createPlayer(). Now let’s look at createPlayer:
Once again, the actual code remains almost identical. The URL we are calling is now http://api.scoreoid.com/v1/createPlayer and we pass the new player’s name in the field username.
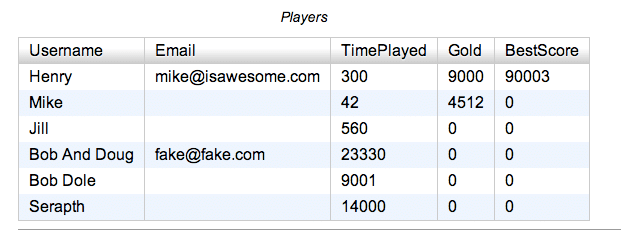
Next we will look at working with XML data instead. If you click the Get All Players button, the following grid will appear:
The YUI grid binds to an XML results set, so this time we are going to call /getPlayers, but instead we want it to return XML results instead of JSON. This code is going to look a bit more daunting then it really is. This is what executes when the user presses Get Players:
Once again we are making a call to the getPlayers url. Notice however that we set Response to XML. This time instead of getting data using Y.io(), we instead want to populate an XML dataset using Y.DataSource.IO(). The actual call is made when we call sendRequest and we pass in the requestCfg here. The remaining code is about selecting which fields from the XML we want to have displayed in the grid.
Speaking of XML, here is the results of getPlayers() in XML form:
<?xml version=”1.0″ encoding=”UTF-8″?>
<players>
<player username=”Henry” unique_id=”” first_name=”” last_name=”” email=”[email protected]” bonus=”0″ achievements=”” gold=”9000″ money=”0″ kills=”0″ lives=”0″ time_played=”300″ unlocked_levels=”” unlocked_items=”” inventory=”” last_level=”” current_level=”” current_time=”0″ current_bonus=”0″ current_kills=”0″ current_achievements=”” current_gold=”0″ current_unlocked_levels=”0″ current_unlocked_items=”” current_lives=”0″ xp=”” energy=”” boost=”” latitude=”” longtitude=”” game_state=”” platform=”” rank=”0″ best_score=”90003″ created=”2013-06-21 16:39:10″ updated=”2013-06-24 16:33:05″>
</player>
<player username=”Mike” unique_id=”” first_name=”” last_name=”” email=”” bonus=”0″ achievements=”” gold=”4512″ money=”0″ kills=”0″ lives=”0″ time_played=”42″ unlocked_levels=”” unlocked_items=”” inventory=”” last_level=”” current_level=”” current_time=”0″ current_bonus=”0″ current_kills=”0″ current_achievements=”” current_gold=”0″ current_unlocked_levels=”0″ current_unlocked_items=”” current_lives=”0″ xp=”” energy=”” boost=”” latitude=”” longtitude=”” game_state=”” platform=”” rank=”0″ best_score=”0″ created=”2013-06-21 16:27:33″ updated=”2013-06-25 15:56:07″>
</player>
—————————— RESULTS SNIPPED ————————————
</players>
As you can see, there is a great deal more information available than what we are choosing to display. Switching between JSON and XML results is a trivial task.
The final part of the Player page illustrates how to retrieve and update a single field of an individual player. The code is pretty much identical to what we have seen thus far. See the getPlayerField() and setPlayerField() functions for more details of how this code works. The fields in the um… Field drop down is set in the players.Template code. It is simply a combo box filled with the available values. Once again, valid values can be obtained from the documentation.
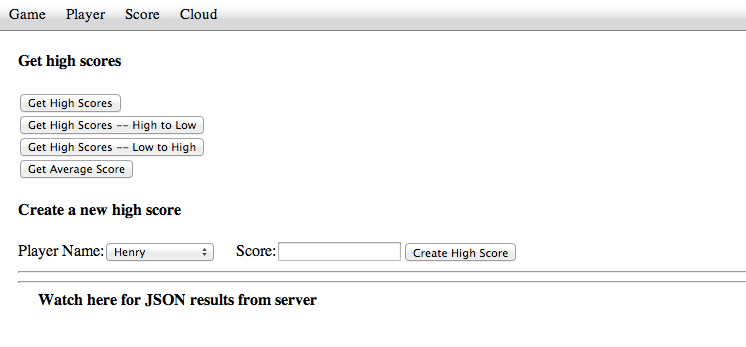
One of the most common tasks that game programmers require a server for is online leader boards. Making an online scoreboard with Scoreoid is a pretty simple affair, as we will see looking at the Scores tab:
The code controlling this form is available at score.View.js. Using this form you can get high scores, get scores sorted high to low and low to high, get the average over all score and create a new high score. At this point in time, the code should be intimately familiar, as the logic is identical, just the URLs and parameters change. The first three buttons call the method /getScores. The only difference is for the sorted results we pass the parameter order_by with the value either “asc” for ascending or “desc” for descending results. Get Average Score calls the method /getAverageScore ( predictably enough… ). The /getScores method has a number of parameters we didn’t use here for fine tuning your results. You can fine tune the results by specifying difficulty level, date range, platform as well as limit your results to N number of values returned. In the end, implementing a complete scoreboard is pretty simple.
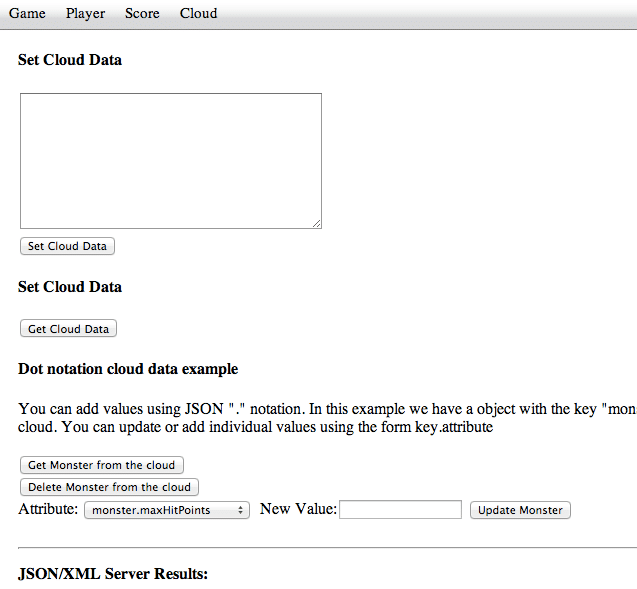
Finally, let’s take a look at the Cloud tab.
Sometimes you just need to store “stuff” ( technical term there! ) in the cloud. This is a key/value database stored at the game level ( more globally ) instead of the player or score level. Most of the code here makes use of the /getGameData() and /setGameData() methods. You can access the code behind this form in cloud.View.js.
If for example you click the Set Cloud Data, the value you pass is going to be written to the hard coded key “myData”. Perhaps the most interesting aspect of Scoreoid cloud storage is it supports JavaScript “dot” notation. So for example, you can set data for monster, such as monster:orc, but also like monster.hp = 42. Here for example are the current results in JSON format if you hit Get Monster from the cloud:
{“monster”:{“alignment”:”Lawful Evil”,”maxHitPoints”:”42″}}
This makes storing structured hierarchical data easy.
So, that’s the basics of using Scoreoid. The API is remarkably consistent, so once you’ve made a single call you pretty much know how to use the entire API. The rest is a matter of looking at the documentation for what parameters and results you can expect. The rest is just a matter of parsing the results that are returned.
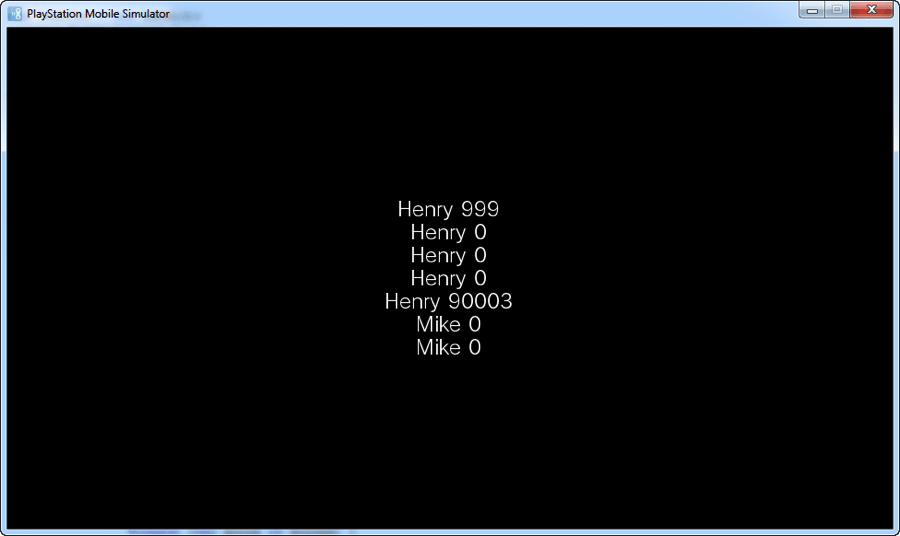
As I mentioned earlier, a REST based API is usable by any programming language capable of making programmatic web requests. So far, I’ve entirely focused on JavaScript, but now I will give an example using a different programming language. In this case, C# for the PlayStation Mobile platform. The following example shows how you would access a scoreboard in a PS Vita application. Since the PSM SDK doesn’t included a JSON parser, but does include an XML one, I’ve gone with XML for the return value.
using System; using System.Collections.Generic; using Sce.PlayStation.Core; using Sce.PlayStation.Core.Graphics; using Sce.PlayStation.Core.Input; using Sce.PlayStation.HighLevel.UI; using System.Net; using System.Linq; using System.Xml.Linq; using System.IO; namespace Scoreoid { public class AppMain { private static GraphicsContext graphics; private const string SCOREOID_KEY = "bde61648959d0c364b04b93e257035abd5ee3b26"; private const string GAME_ID = "3e99cf43ab"; public class ScoreEntry { public string Name; public string Score; } public static void Main (string[] args) { graphics = new GraphicsContext(); UISystem.Initialize(graphics); var scene = new Sce.PlayStation.HighLevel.UI.Scene(); var panel = new Panel() { Width = graphics.Screen.Width, Height = graphics.Screen.Height }; var textOut = new Label(); textOut.Width = panel.Width; textOut.Height = panel.Height; textOut.HorizontalAlignment = HorizontalAlignment.Center; textOut.Text = "High Scores Go Here"; panel.AddChildFirst(textOut); scene.RootWidget.AddChildFirst(panel); var request = HttpWebRequest.Create (@"http://api.scoreoid.com/v1/getScores?response=XML&api_key=" + SCOREOID_KEY + "&game_id=" + GAME_ID); request.ContentType = "application/xml"; request.Method = "GET"; using (HttpWebResponse response = request.GetResponse() as HttpWebResponse) { if (response.StatusCode != HttpStatusCode.OK) Console.Out.WriteLine("Error fetching data. Server returned status code: {0}", response.StatusCode); else { using (StreamReader reader = new StreamReader(response.GetResponseStream())) { var content = reader.ReadToEnd(); if (string.IsNullOrWhiteSpace(content)) { System.Diagnostics.Debug.WriteLine("Scoreoid returned no results"); } else { XDocument doc = XDocument.Parse(content); var scores = (from e in doc.Root.Elements("player").Elements("score") select new ScoreEntry { Name= (string)e.Parent.Attribute("username"), Score= (string)e.Attribute("score") }).ToList(); string text = ""; foreach (var score in scores) { text += score.Name + " " + score.Score + "n"; } textOut.Text = text; } } } } UISystem.SetScene(scene); while(true){ graphics.Clear (); UISystem.Update(Touch.GetData(0)); UISystem.Render (); graphics.SwapBuffers(); } } } }
If you run this code, you will see:
If you look closely at the code, the actual Scoreoid calls take only a few lines of code. You create a HttpWebRequest passing the URL as well as the parameters in the URL ( this time we are doing a GET request instead of a POST request ). Then its simply a matter of getting the results using GetResponse(). The remaining code is about parsing the XML results and PSM specific display code.
Other Info
There are a few downsides to outsourcing your game server that you need to be aware of up front. What happens if something happens to your provider or you want to switch providers? Here is Scoreoid’s policy on data from their website:
With Scoreoid your data belongs to you, we respect that you retain ownership of your data. Scoreoid isn’t another game network taking away your most valuable asset your players and game data. Our bulk storage engine is MongoDB, our preferred method of returning your data to you is via zipped ‘mongodump’.
MongoDB is a freely available open source NoSQL database with binaries available on Windows, Mac, Linux and Solaris.
The next most obvious question… what does it cost?
This one is a bit trickier to answer, as as of right now, the pricing hasn’t been set. The good new is, right now it’s completely free! There are a number of live games currently using Scoreoid. That then leaves the question, what will it cost? For that, we go to the FAQ:
How much will the pro accounts cost?
We’re currently focusing on adding new features and we’re still working on the pro account options of course there will always be a freemium option.
Scoreoid’s mission statement is to provide a free version to every developer which includes updates and new features. We believe every game developer should have an option to use Scoreoid helping them save time and cost while allowing them to improve there game titles and brand.
As for pricing we will offer a number of plans that will fit every developers budget. Currently looking at having 3 main plans between $15 to $50 per month and then a 4th enterprise plan for big publishers and big game studios.
We’re also looking at the possibility of have a $5/$8 month option for developers who use very little data or bandwidth.
Our goal is be very cost effective and help game developers, most users will be fine with the free or lower end plan. Transparence is very important to us especially with our pricing model we will notify all users in advanced before we active the pro options.
We also plan on doing active surveys before we activate the pro plans as we would like to get as much feedback as possible from our users giving you a chance for direct input and influence.
I have been using Scoreoid since it launched what will happen when pro accounts are activated?
All current users who are using Scoreoid for active games (who have at least one live game that is using Scoreoid) and decide to upgrade to a pro account will receive major discounts and additional benefits. We will also include you in our “loyalty program”.
We will keep your current plan and limits for set time limit grandfathering you into a new plan sets. Don’t forgot Scoreoid will always offer a freemium option.
So basically, the prices aren’t set yet, they will be tiered from free on up and if you publish now you will get a discount once pricing goes live. Perhaps most important of all for smaller publishers, there will always be a free tier.
So if you are looking at adding server side functionality to your game and don’t want to roll your own solution, consider checking out Scoreoid.

