In this tutorial we are going to cover playing sound effects and music files. We are also going to implement a simple menu system to control everything. The example sound effect and song are taken from the cocos2D HTML tests.
First we need to preload our sound effect files. Remember the preload in main.js? Now we are going to actually use it. Open up main.js and make the following change:
cc.AudioEngine.getInstance().init("mp3,ogg,wav"); cc.Loader.shareLoader().preload([ {type:"effect",src:"Resources/effect2"}, {type:"bgm",src:"Resources/background"} ]);
Here we preload our song and sound effect for later playback. It doesn’t have to be in this file, but it guarantees that it has happened when we need it. You will need to add a pair of mp3 files in a subdirectory named Resources, background.mp3 and effect2.mp3. Obviously you can use whatever files you want, but be sure not to add the file extension here.
The out key call is the call to init(). This call initializes the AudioManager singleton. The parameter are the supported file formats. mp3, ogg and wav are the supported options. This value determines what extension the loader will use when looking for your resources. Each browser supports different file formats, so if you want to playback in as many browsers as possible, it is ideal to provide all three options. For example, if you do not provide ogg, Chromium on Ubuntu will not play any sound.
Now lets take a look at MyFourthApp.js:
var MyFourthApp = cc.LayerColor.extend({ init:function() { this.initWithColor(new cc.Color4B(0,0,0,255)); var size = cc.Director.getInstance().getWinSize(); cc.AudioEngine.getInstance().setEffectsVolume(0.5); cc.AudioEngine.getInstance().setBackgroundMusicVolume(0.5); var menuItem1 = new cc.MenuItemFont.create("Play Sound",this,this.playSound); var menuItem2 = new cc.MenuItemFont.create("Play Song",this,this.playSong); var menuItem3 = new cc.MenuItemFont.create("Stop Playing Song",this,this.stopPlayingSound); var menuItem4 = new cc.MenuItemFont.create("Exit",this,this.exit); menuItem1.setPosition(new cc.Point(size.width/2,size.height/2+50)); menuItem2.setPosition(new cc.Point(size.width/2,size.height/2)); menuItem3.setPosition(new cc.Point(size.width/2,size.height/2-50)); menuItem4.setPosition(new cc.Point(size.width/2,size.height/2-100)); var menu = cc.Menu.create(menuItem1,menuItem2,menuItem3,menuItem4); menu.setPosition(new cc.Point(0,0)); this.addChild(menu); return this; }, playSound:function(){ cc.log("Playing sound"); cc.AudioEngine.getInstance().playEffect("Resources/effect2"); }, playSong:function(){ cc.log("Playing song"); cc.AudioEngine.getInstance().playBackgroundMusic("Resources/background",false); }, stopPlayingSound:function(){ cc.log("Done playing song"); if(cc.AudioEngine.getInstance().isBackgroundMusicPlaying()) { cc.AudioEngine.getInstance().stopBackgroundMusic(); } }, exit:function(){ document.location.href = "https://www.gamefromscratch.com"; } }); MyFourthAppScene = cc.Scene.extend({ onEnter:function(){ this._super(); var layer = new MyFourthApp(); layer.init(); this.addChild(layer); } });
The guts of this are identical to the last tutorial, with the obvious exception of changed names.
The following two lines set the background volume for both music and effects to 50%. As you can see, AudioManager is available as a singleton object, just like Director.
cc.AudioEngine.getInstance().setEffectsVolume(0.5); cc.AudioEngine.getInstance().setBackgroundMusicVolume(0.5);
Next up we create 4 different MenuItemFont objects:
var menuItem1 = new cc.MenuItemFont.create("Play Sound",this,this.playSound); var menuItem2 = new cc.MenuItemFont.create("Play Song",this,this.playSong); var menuItem3 = new cc.MenuItemFont.create("Stop Playing Song",this,this.stopPlayingSound); var menuItem4 = new cc.MenuItemFont.create("Exit",this,this.exit);
MenuItemFont is one of the available types of menuitems ( there is also a sprite based menu item ) that compose a menu. For each one, you specify the text to display, the owning container as well as a callback function that is called when the menu is selected. We then position each menuitem relative to the center of the screen, each one placed 50 pixels apart. We then create our Menu item by passing in a variable number of MenuItem, like this:
var menu = cc.Menu.create(menuItem1,menuItem2,menuItem3,menuItem4);
Finally we position our menu and add it to our layer.
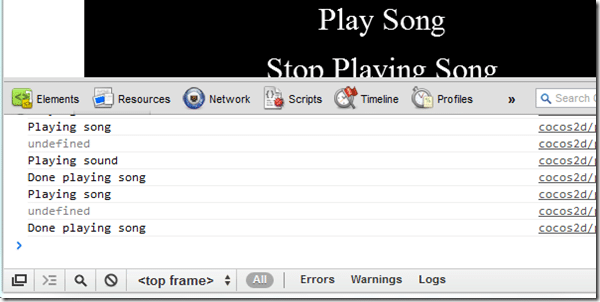
Next we have our 4 different callback function. cc.log simple logs whatever text out to the console. So if you have the developer console open in Chrome, or Firebug on Firefox, you will see the following when the code is run:
cc.Log is an effective and easy way to keep track of your code’s execution without requiring the debugger.
In the event of selecting “Play Sound” the playSound() method is fired, which calls:
cc.AudioEngine.getInstance().playEffect("Resources/effect2");
This uses the AudioManager singleton to play our preloaded effect “effect2” in the folder “Resources” using the playEffect() method.
In the event of selecting “Play Song”, the playSong method is fired, which plays a song using the function:
cc.AudioEngine.getInstance().playBackgroundMusic("Resources/background",false);
If “Stop Playing Song” is selected, the stopPlayingSound method is fired, which checks if a song is currently playing and stops it if one is. Like this:
if(cc.AudioEngine.getInstance().isBackgroundMusicPlaying()) { cc.AudioEngine.getInstance().stopBackgroundMusic(); }
Finally, in the event Exit is called, the app simply redirects the user to a great website.
As always, you can download the full project ( including all audio files ) right here.
Here is our application in action:
Read Tutorial 6

