
Right off the hop for my new game I have to deal with a problem that many games have to deal with but one that could have a huge impact on how my game is structured, so I am going to address it with a proof of concept right up front. That thing, as the title probably spoils, is character customization.
As I said earlier, this is a pretty common problem in games and something you see questions about quite often if you hang around game development forums for any period of time. So what do I mean with character customization? Ever played Diablo or a similar title? When you change your gear in Diablo, your character is updated on screen. This behaviour is pretty much expected in this day and age… personally I really hate when I am playing an RPG and the weapon I equip has no affect on my avatar. That said, it is certainly a non-trivial problem and one that could have a pretty big impact on your game.
Let’s start by taking a look at the various options… at least the ones I can think of.
2D – Pre-render all possible configurations
Of course, brute forcing it is always a possibility and in a few cases may actually be ideal. Basically for a 2D game, you simply create every combination of sprite for every combination of equipment. So if you have an animation sequence for “walk_left” and “walk_right”, you would have to create a version for each possible equipable item. So you might have “walk_left_with_axe” and “walk_left_with_sword” sprite sheets for the different weapon combinations. If you are rendering your spritesheets automatically from a 3D application, this could actually be the easiest approach. Of course there are some seriously massive downsides to this approach. Memory usage quickly becomes outrageous. For each piece of equipment you double the size of your original sprite sheet for example. Once you start adding more and more options, this approach quickly becomes unfeasible. If you only have a very small amount of customization ( two or three weapon options ), this approach may appeal due to it’s simplicity. With anything more than a couple combinations though, this approach is pretty much useless.
2D – Pre-rendered spritesheet + pre-rendered weapon animation frames.
You can use a regular sprite sheet and simply keep the weapons separate. So basically you have two separate sprite sheets, one of the character without weapons, one with just the weapons. Then at run-time you combine them. Consider these two sprite sheets ( taken from a StackOverflow question ).
Animated Character:
EDIT: Question and Image Sadly Removed… Learn my lesson about hotlinking!
Weapon:
EDIT: Also removed.
Then at run-time you combine the two sprites together depending on what is equipped.
In fact, if your weapon isn’t animated ( as in, it doesn’t move, like a sword, as opposed to a weapon like a whip or nunchucks ) you can get by using a hard point system, where you define the mount position of the weapon ( for example, the players right hand ) and orientation. Basically for each frame of animation, you provide an x and y coordinate as well as rotation amount that represents where and how the weapon should be mounted. Then at runtime you combine the two sprites, positioning and rotating the weapon sprite relative to the mount/hardpoint. This way, you only need a single image per equipable weapon.
This approach has a couple downsides. First, you need a separate data file to hold mount point data and possibly a tool to generate it. Second, it makes bounding/hit detection more difficult as the mounted weapon may exceed the dimensions of the originating sprite. Third, you need to deal with z-depth issues, you cant simply paste the weapon on top of the sprite, as what happens when the character is walking right but carrying the weapon in the left hand? To handle this your workflow needs to basically be: render obscured weapons, render character sprite, render foreground weapons. Finally, weapons with their own animation, like a whip snapping, would require even more effort.
All told, this is probably the easiest while still flexible system for 2D animation. It requires a bit more work than simply brute forcing your sprite sheets, but the payoffs in reduced size and complexity are well worth it, especially if you have more than a couple items. One other big win about this approach is then weapons can be re-used across different sprites, a huge win! Then you can model a single sword and it will be available to all sprite sheets with hard/mount point information available.
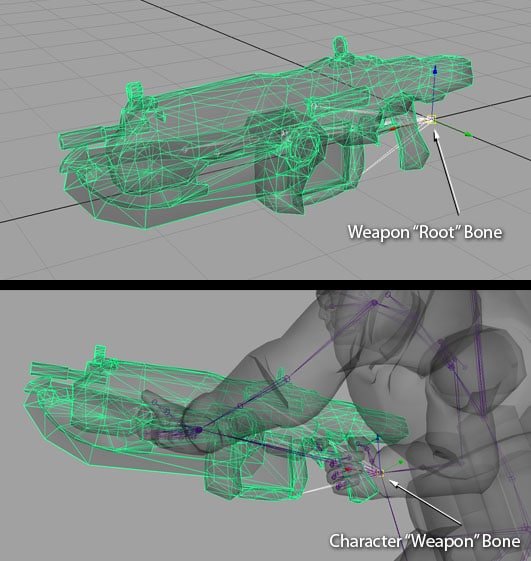
3D – Bone/hardpoint system
If your game is pure 3D this is often the way you want to go. If you character is a knight for example, in your 3D modelling application you create named hard points in your model, either as bones or as an object of some form such as a null object, point or invisible box. Then at runtime you bind other models to those locations. So for example, if you equip a long sword and shield, your code searches for the “right_arm_shield” bone and uses it as the parent object for a shield 3D model. Then you bind a sword to say… the “left_arm_hand” bone. You can see an example of this behaviour in this UDK example.
This approach is basically identical to the last 2D method mentioned except in 3D and that you dont generally need to define your own hardpoint system, as most 3D packages and engines already support it out of the box, either by binding to a bone or by accessing and parenting 3D objects to named locations. Like working in 2D, then your weapon and character are two separate entities, like so:
One of the major advantages of 3D over 2D is flexibility. Most animations in 2D need to be pre-calculated, while in 3D you have a great deal more flexibility with the computer filling in the blanks for you. Unlike in 2D, additional 3D animations add very little to the data file sizes.
2D Bone based animation
One of the major downsides to 2D animation is, as you add more animations, it takes up more space. People have been working on solutions, one of the most common of which is 2D bone animation. How exactly can you use bones on a 2D image file you ask? That’s a good question! In 3D, its pretty simple… the motion/influence of the bone transforms the attached geometry. In 2D, there is no geometry, so how can you do this?
Well, the simple version is, you cut your bitmap or vector image up into body parts. So instead of a single image of an animated character, you instead of an image for the foot, lower leg, upper leg, torso, waist, shoulder, left upper arm, etc… Then you can draw 2D bones that control the animation of this hierarchy of images. There are applications/libraries that support this, making it mostly transparent for you. Here is one such example from Spine from Esoteric Software.
The character:

It looks like a single image ( and you can see a couple bones being drawn in the foot/leg area ), but it is actually composed of a few dozen source images:

Basically the workflow goes, you create your traditional image in your regular art program, except instead of creating a single image, you create dozens of hopefully seamless ones representing each body part. You stitch them together, setting the drawing order ( what’s covering what ), then define bones to create animations. This has the double advantage of massively decreasing space requirements while simplifying the animation process. The downsides are creating your initial image are a great deal more difficult and of course, you need to buy ( or roll your own ) bone system, such as Spine.
Spine is not the only option, there is also Spriter from BrashSoftware and probably others I am unaware of. Both of these are commercial packages, but then, both are dirt cheap ( IMHO ) with price tags between $25 and $250 dollars, with $60 and $25 dollars being the norm with each package respectively.
The nice thing about taking this segmented bone approach… you basically get the ability to swap components or bind weapons for free.
2.5D hybrid approach
2 1/2D is becoming more and more popular these days. Essentially a 2.5D game is a 3D game with 2D assets ( such as 2D sprites over a 3D background ), but more commonly its 3D sprites over a 2D background. How does this work?
Well, there are two basic approaches. You model, texture, animate your 3D model as per normal. Any character customization you perform you would do as if you were working in full 3D. Now is where the two different approaches vary, depending on performance, the hardware you are running on, etc… You can either generate a sprite sheet dynamically. Essentially when your character is loaded or you change equipment, in the background your game renders a sprite sheet of your updated character containing every animation frame, then you use this sheet as if it was a normal 2D sprite sheet. The other option is, you render your character each time it moves. Creating a spritesheet consumes more memory, but very little GPU or CPU demand. Generating your characters’ current animation frame dynamically, on the other hand, takes almost no memory, but at a much higher CPU/GPU burden. Which is right for your game is obviously up to you.
Of course, the 2.5D approach certainly has it’s share of problems too. First off, it is the most complicated of the bunch. Second, you can’t do any “by hand” calculations on your generated sprite/spritesheets, as they are now being rendered dynamically. This means no ability to create pre-calculated bounding volumes for example. On the other hand, the 2.5D approach gives you most of the advantages of 3D ( compact animation data structure, easy programmable modification, ability to alter texture mapping, lighting effects, etc… ) that 3D does, but with the simplicity of dealing with a traditional 2D world.
One animation to rule them all!
You may be thinking WAHOO… I can cut my work way down now! All I need to do is animate an attack sequence and then I can simply substitute the different weapon images. Not so fast I am sorry to say. Think about it this way… are the images for swinging an AXE and a Sword the same? What about a pole arm? You are still going to have several different animations to support different classes of weapons, but these techniques will still vastly reduce the amount of data and work required while allowing a ton of customization.
So then, what am I going to do?
So, which approach am I taking? Ultimately I am going to require a great deal of customization, going far beyond the examples described above. One such example scenario is a Mech with a customizable left weapon… this weapon could be an arm holding a gun, a turret containing one or more guns, or possibly even a large pack of rockets. Each “weapon” could have its own animation set. Oh, and I am much more proficient in 3D than 2D. On the other hand, the game itself is a 2D game and I would prefer to keep it that way for the simplicity that brings in a number of areas ( level creation tools, path-finding, and other AI tasks, physics, cheating at art, etc… ). As a result, I am going to try the 2.5D approach, where the mech is created and animated in 3D, dynamically equipped, then rendered to 2D. I am going to try both pre-rendering sprite sheets and dynamically rendering a single frame and see what the overhead of each is. I actually have the compounded issue of dealing with enemy characters that are also dynamically generated, so any impact will be magnified many times over!
If I can’t get adequate performance from each approach, I may be forced to go full 3D and emulating a 2D look. As I said, it’s one of those things that can have a major impact on your game! That said, I am pretty confident performance won’t be too much of a factor. My immediate take away task list is:
- get a LibGDX project set up that can load and render a textured, animated 3D model exported from Blender. I am pretty new to 3D in LibGDX ( okay… completely new to it )
- bind another model to a bone on this model ( aka, a sword to a hand bone )
- try to dynamically generate a sprite sheet of the character’s complete animation. Measure resulting memory usage and time required to generate sheet
- re-architect the code to instead generate each frame of animation per frame on demand.
- scale both scenarios up to include multiple instances and see results on performance
- measure performance impact of each approach on both desktop and mobile.
The outcome of this experiment will ultimately decide what approach I take. Stay tuned if that process sounds interesting!
Oh, and of course, these are only the scenarios I could come up with for dealing with dynamically equipped characters, if you have another idea, please share it!