Today we are going to take a quick look at the Tilengine 2D game engine. Tilengine in their own words is:
Tilengine is a free, cross-platform 2D graphics engine for creating classic/retro games with tilemaps, sprites and palettes. Its unique scanline-based rendering algorithm makes raster effects a core feature, a technique used by many games running on real 2D graphics chips.
Tilengine is open source (sorry, the core isn’t open ), available on Github however I never could locate what license it’s released under.
EDIT—Since posted, there has been a bit of conversation about the licensing since this was posted, read here.
It’s a C library, but contains bindings for Python, C# and Java. I’m actually going to use the C# bindings for the example in this review as it’s the least documented of the available bindings. There is a single page class reference available here and a small manual available here. The engine is geared towards creating retro sprite style games and handles graphics, animations, palettes, input and window management, but has no sound or physics engine built in. It is also designed to be used as a backend solution to an existing front end renderer. There are several C based examples available here, and this represents the primary way you will get up to speed. The graphics system is designed to emulate classic sprite systems like Sega’s SuperScaler arcade board but with Super Nintendo’s Mode 7 style graphics effects available. Tilengine is layered over SDL and is cross platform, capable of running on most desktop operating systems, as well as Raspberry Pi devices.
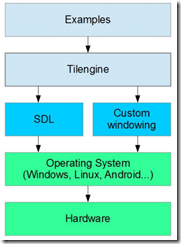
Tilengine is composed like so:
Tilengine has direct support for tiled map files created using the Tiled map editor. If you want to learn more about Tiled, I have done a complete tutorial series available here.
As a pretty straight forward game engine, let’s jump right in with the example created using the C# bindings:
using Tilengine; namespace ConsoleApplication { public class Program { public static void Main(string[] args) { var engine = Tilengine.Engine.Init(320,240,1,16,16); var window = Tilengine.Window.Create("",Tilengine.WindowFlags.Vsync); // This is the clear color drawn each frame. Think of it as the sky color engine.BackgroundColor = new Color(0,128,238); // Load tsx and tmx file. These are created in the Tiled level editor // tsx is a collection of tiles, tmx is a map painted using those tiles var tileset = Tileset.FromFile("SOTB_bg.tsx"); var tilemap = Tilemap.FromFile("SOTB_bg.tmx","Layer 1"); // create a new layer using our just loaded tiles. Games can have multiple layers var layer = new Layer(); layer.Setup(tileset,tilemap); layer.SetPosition(0,0); // Now we are loading an animated sprite riped from the 90s classic Shadow of the Beast // Spriteset is simply the image collection composing our game Spriteset // SequencePack is simple text format describing the available animations, their frames, speed etc // While Sequence is a named entry in the SequencePack text file Spriteset ss = Spriteset.FromFile("SOTB"); SequencePack sp = SequencePack.FromFile("SOTB.sqx"); Sequence walk = sp.Find("walk"); // Now finally create a sprite using our spritesheet Sprite sprite = new Sprite(); sprite.Setup(ss,TileFlags.None); int spriteX = 15; sprite.SetPosition(15,215); // Now play the animation sequence named "walk". We also pass the final 0 in to tell it how many times the animation // should loop. Zero equals forever Animation anim = new Animation(); anim.SetSpriteAnimation(0,walk,0); int frame = 0; // This is your game loop while(window.Process()){ // Draw the current frame of graphics (sprites, layers, etc) window.DrawFrame(frame++); // Now check if left or right arrow/gamepad are pressed, in which case move in that direction // IF moving left, flip the sprite over on the X axis if(window.GetInput(Input.Right)){ spriteX ++; sprite.Flags = TileFlags.None; } if(window.GetInput(Input.Left)){ spriteX --; sprite.Flags = TileFlags.FlipX; } sprite.SetPosition(spriteX, 185); if(spriteX > engine.Width) spriteX = 0; } //Cleanup tilemap.Delete(); tileset.Delete(); window.Delete(); engine.Deinit(); } } }
The comments pretty much describe everything that is going on there. For more details, be sure to check the video version of this tutorial available here [coming soon]. This example loads a sprite and animation from the game Shadow of the Beast, an Amiga platformer classic. The SequencePack file format is extremely simple XML file, here is the example used:
<?xml version="1.0" encoding="UTF-8"?> <sequences> <sequence name="walk" delay="6" loop="0"> 1,2,3,4,5,6 </sequence> </sequences>
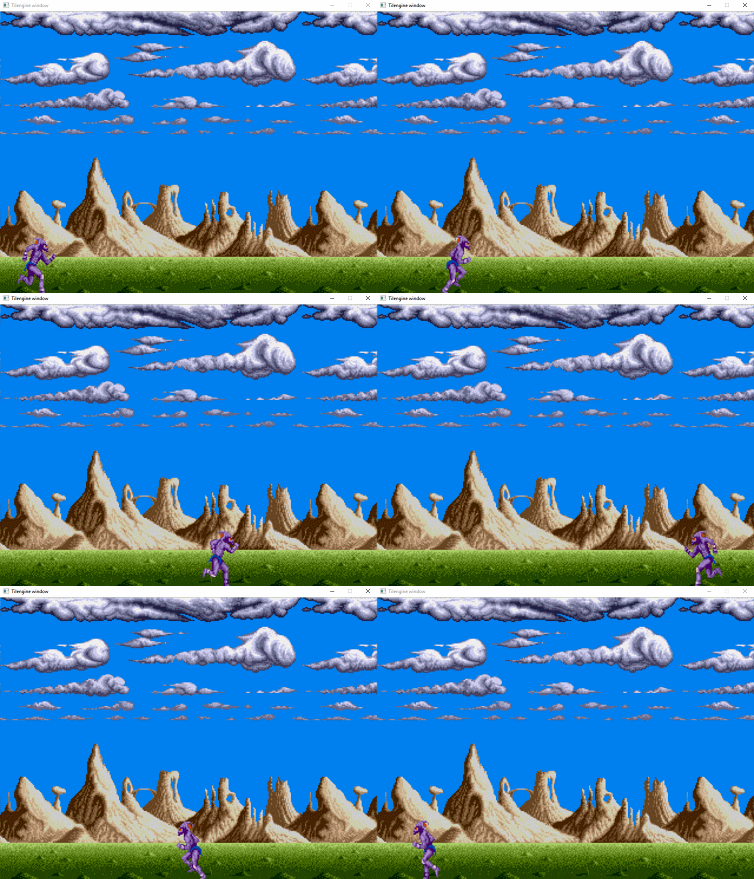
The tsx and tmx files are generated using the Tiled level editor, another open source and free tool. As you can see, it’s extremely simple to get up and going. Run this code you will see:
This is of course a primitive example, but does show the many parts of a game. A game loop, sprite loading, animations, level loading, etc. The major features of the engine, that I’m not covering here, are the various sprite effects it emulates. You can see these effects demonstrated here or in the samples.
The Video


