Earlier on in the ongoing HaxeFlixel Tutorial series we covered drawing sprites, a fairly critical concept to any 2D game. Today we are going to take that one step further and look at the process of animating them. If you look at the FlxSprite class you will notice there is a member animation which is a FlxAnimationController. This is the class we are going to be focusing on today. However in order to animate sprites, we need sprites to animate. 2D animation is a lot like those flipbook animations you may have drawn on the corner of books. Like the following:

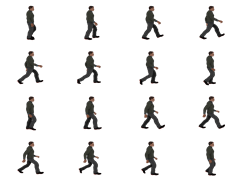
This is exactly what we are going to do here. Except instead of multiple pages of animations, we are going to put all of our sprites in a single image file. This one in fact. (Click to view full size)
At it’s full size this image is composed of 16 frames of our sprite, each one 512×384 in size. When we create our FlxSprite, we use a slightly different setup than we did in the past.
spritesheet = new FlxSprite(); spritesheet.loadGraphic(AssetPaths.walk__png,true,512,384);
Here when we call loadGraphic we pass in the width and height of the rectangle within the larger image that represents our individual sprite. Next we need to define our animation.
spritesheet.animation.add("walkRight",[0,1,2,3,4,5,6,7,8,9,10,11,12,13,14,15],5,true);
Here we are adding an animation with the name “walkRight”, then we pass in the individual frame indexes that represent this animation. These represent the index of the sub-rectangle within our source image, starting at the top left, going across to the right and down a row. Therefore in this case 0 is the animation frame at the top left corner, 1 would be the one to it’s right, 4 would be the first image on the second row, 15 would be the final image in the sequence, etc. After the array of indices, we pass in the frame rate. In this case we are saying to play this animation at a rate of 5 frames per second.
One cool thing we can do is actually flip the animation on the X or Y axis, enabling us to use the same images for a walkLeft animation, like so:
spritesheet.animation.add("walkLeft",[0,1,2,3,4,5,6,7,8,9,10,11,12,13,14,15],5,true,true);
It’s the exact same parameters, except with a different name and we pass in true to the FlipX parameter.
After we have defined our animation(s) and add() it, we need to tell the game engine which one to play, like so:
spritesheet.animation.play("walkRight");
Let’s put some code in the update() callback that flips the direction of animation when the player presses the spacebar.
if(FlxG.keys.justReleased.SPACE) if(spritesheet.animation.name == "walkRight") spritesheet.animation.play("walkLeft"); else spritesheet.animation.play("walkRight");
You can also easily alter the speed an animation plays after it has been loaded, like so:
if(FlxG.keys.justReleased.UP) spritesheet.animation.curAnim.frameRate++; if(FlxG.keys.justReleased.DOWN) spritesheet.animation.curAnim.frameRate--;
We also have the ability to stop a playing animation, like this code that does it when ESC is hit.
if(FlxG.keys.justReleased.ESCAPE){ spritesheet.animation.curAnim.curFrame = 0; spritesheet.animation.finish(); }
You do not have to set the frame to the beginning, but it helps if you want to transition to another animation or restart the existing one.
The animation controller also has a pair of callback functions that can be called each frame of an animation, or when an animation ends. Please note that in this case we created our animation to loop by default, so the callback will only be called if you hit the ESC key to stop the animation manually. Or you turn looping off when you define the animation sequence.
spritesheet.animation.callback = function(s:String, frame:Int, index:Int){ trace("Animation:" + s + " -- frame: " + frame + " index: " + index); } spritesheet.animation.finishCallback = function(s:String){ trace ("------------------------ " + s + " anim finished ------------------"); }
Ok, let’s look at that as one complete example now.
package; import flixel.FlxG; import flixel.FlxSprite; import flixel.FlxState; import flixel.text.FlxText; import flixel.util.FlxColor; class PlayState extends FlxState { var spritesheet:FlxSprite; var text:FlxText; override public function create():Void { super.create(); this.bgColor = FlxColor.GRAY; text = new FlxText(0,0,300); add(text); spritesheet = new FlxSprite(); spritesheet.loadGraphic(AssetPaths.walk__png,true,512,384); spritesheet.animation.add("walkRight",[0,1,2,3,4,5,6,7,8,9,10,11,12,13,14,15],5,true); spritesheet.animation.add("walkLeft",[0,1,2,3,4,5,6,7,8,9,10,11,12,13,14,15],5,true,true); add(spritesheet); spritesheet.animation.play("walkRight"); spritesheet.animation.callback = function(s:String, frame:Int, index:Int){ trace("Animation:" + s + " -- frame: " + frame + " index: " + index); } spritesheet.animation.finishCallback = function(s:String){ trace ("------------------------ " + s + " anim finished ------------------"); } } override public function update(elapsed:Float):Void { super.update(elapsed); if(FlxG.keys.justReleased.SPACE) if(spritesheet.animation.name == "walkRight") spritesheet.animation.play("walkLeft"); else spritesheet.animation.play("walkRight"); if(FlxG.keys.justReleased.UP) spritesheet.animation.curAnim.frameRate++; if(FlxG.keys.justReleased.DOWN) spritesheet.animation.curAnim.frameRate--; if(FlxG.keys.justReleased.ESCAPE){ spritesheet.animation.curAnim.curFrame = 0; spritesheet.animation.finish(); } text.text = "Cur speed: " + spritesheet.animation.curAnim.frameRate; } }
Here is the results. Press SPACE to flip direction, UP and DOWN to control animation speed and ESC to stop the animation all together.
The Video
[Coming Soon]

