This is the first part of my adventure creating a simple game for my daughter.
One of the catches with a JavaScript game, as you saw from this earlier tutorial, to take full advantage you need a client and a server. However, once you want the server to start doing “stuff”, you want as much control over it as possible. The advice “write your own!” is normally remarkably stupid, but with Node, it actually isn’t! In fact, you can create a fully functioning server in only a couple lines of code. If you are looking for a way to deploy an advanced JavaScript application, read on.
If you’ve never experienced Node before, basically it is a server side implementation of Google’s V8 Javascript engine, and a whole TON of plugins to do just about everything. Perhaps the biggest selling point is, it allows you to work in both Javascript on the client and server. It is also easy to deploy, massively asynchronous, scalable and frankly, kinda cool. The first thing you are going to need to do is install it on your computer. The install process is remarkably simple, although when you are done I would suggest adding node to your PATH environment variable if you are working on Windows.
Now that you have Node installed, let’s create a simple server. Create a file called server.js like this:
var express = require('express'), server = express.createServer(); server.use('/cocos2d', express.static(__dirname + '/cocos2d') ); server.use('/cocosDenshion', express.static(__dirname + '/cocosDenshion') ); server.use('/classes', express.static(__dirname + '/classes') ); server.use('/resources', express.static(__dirname + '/resources') ); server.get('/', function(req,res){ res.sendfile('index.html'); console.log('Sent index.html'); }); server.get('/api/hello', function(req,res){ res.send('Hello Cruel World'); }); server.listen(process.env.PORT || 3000);
And… that’s it, a fully functioning web server.
That first line is the key, where we require(‘express’). Express is the module that is doing the heavy lifting on the server side.
There is however a small amount of configuration you need to do. You need to tell node to install the express module. This is pretty simply done though, open a command prompt and navigate to your project directory, then type:
npm install express
npm is the node package manager, and it will download and configure your project to work with express. Now that we are configured, lets get back to code.
The next four lines are defining a series of static routes. Essentially, if a web request comes in to any of these paths ( for example http://localhost/cocos2d ), node will simply serve the files back to the requesting browser, just like IIS or Apache would. These four lines will result in /cocos2d, /cocosDenshion, /classes and /resources folders having their files served, so when your HTML file requests /classes/cocos2d.js, the file will be returned. This is how we will allow our user to download our scripts and resources. In this particular, I am porting the class from this tutorial to run from Node, which is why we require a resources and cocosDenshion folder.
Next is a GET request handler for “/”. In HTTP, there are two kinds of requests, GET ( urls ) and POST ( form submissions ). In this line we are saying if someone requests our web root, our function is called, which simply sends the file index.html back.
A moment later, we set up another GET handler for the route (URL) /api/hello, which simply returns the string “Hello Cruel World”. This is a very simple web service, and we will see it in action shortly.
Finally we start our server listening on port 3000, or whatever port the running environment forces us on, in case our host has such limitations. At this point, we have a fully functioning web server.
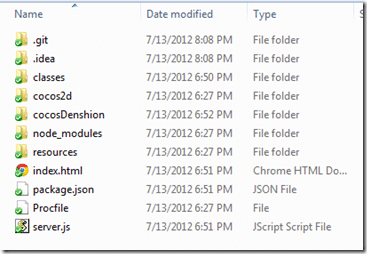
However, I made a few alterations to the last tutorial’s file layout to better be served by Node. Our folder structure now looks like:
Don’t worry if you are missing a few folders ( .git and .idea for example ) or files ( package.json or Procfile ), we will covers those later.
I altered all the paths in cocos.js and MyFourthApp.js because cocos2d was moved to the classes folder. Otherwise the code is pretty much unchanged from the last tutorial. You can download the full source at the end of this post if you want to see the complete changes.
I did make a few small alterations though, beyond changing paths. I added a reference to jQuery in index.html, like this:
<script src="http://cdnjs.cloudflare.com/ajax/libs/jquery/1.7.1/jquery.min.js"></script> <script src="classes/cocos2d.js"></script>
I also added the following line to cocos2d.js:
else { cc.setup("gameCanvas"); jQuery.get("/api/hello", function(data,textStatus,jqXHR){ cc.Log(data); });
So what exactly is this line of code doing?
Remember earlier in server.js where we added a route handler for /api/hello? Well this is about as simple a REST based web request as you can make. This uses jQuery to make an AJAX call to our server, which returns the string “Hello Cruel World”, which we log to the console.
Why? Well, absolutely no reason… yet. But this is a very primitive example of something we are going to do in more complexity later on. We can do processing on our node based server, and handle it in our cocos2D client. Through this mechanism we can make up for the limitations of client side Javascript, or enable server side functionality. You can easily request data from a server without having to reload your page.
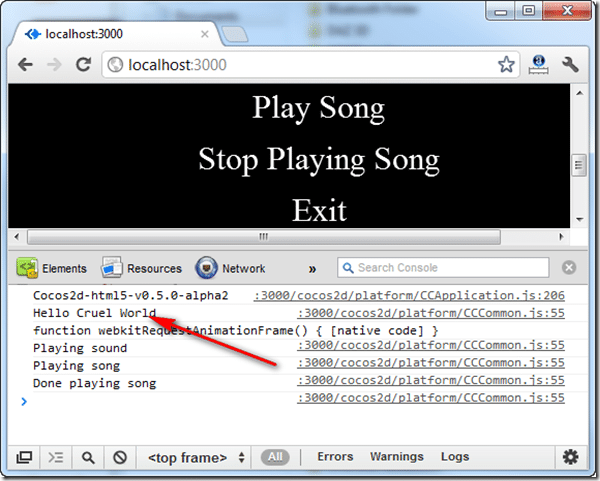
Now you can run your server. Open a command prompt, navigate to your project directory and type node server.js. If all went well, there should be no error messages. Now open up a web browser and navigate to http://localhost:3000 like this:
Here is your cocos2D application hosted in a custom Node server viewed in a browser, and if you look at the JavaScript console, you will see the “Hello Cruel World” message logged by cocos, but returned asynchronously from the server. To shut down your server, simply press CTRL + C.
At this point we have a working web server, capable of hosting a cocos2D application ( and replacing the need for WAMP completely ), making successful, if simple, web services calls between the client and server.
You can download the full project right here.
Next up, we will look into a problem many web developers face… where the heck am I going to put this thing???
EDIT: Next part is now up.


