As I mentioned earlier, I have recently discovered Node.JS. Quick version, Node is a server side Javascript engine, allowing you to easily create applications on the server. Obviously you could use SFML on both the client and the server but many people find Javascript a much faster language to work with. The libraries bundled with Node make this task extremely easy.
We are going to create a very simple “High score” system, allowing users to push their score to the server as well as get a list of the current high scores.
You may notice Node referred to as Node, Node.js and NodeJS, which is correct? Beats the hell out of me! I frankly just use them all, so if you notice me switching terms, remember they are all referring to the same thing. I am assuming you are using Windows 7 and Visual Studio for this tutorial, but there are no reasons you can’t use different OSes or IDEs.
First off, lets get Node installed, which you can download here. Run the installer and node will be installed to your machine. Really that’s about it. Optionally you can add the install directory to your PATH environment variable, in my case it was C:Program Files(X86)nodejs, this will save you a ton of key strokes later and for the following instructions I will assume you have performed this step.
Now that you have installed node, we can create our server; you are about to see how laughably easy this is using Node. Create a file server.js in your editor of choice, in my case I am using JetBrain WebStorm ( on a 30 day trial ) and have been impressed so far, but you can use any text editor including Notepad. In server.js add the following code:
var dgram = require('dgram'); var server = dgram.createSocket('udp4'); console.log("Socket createdn"); server.on("message",function (msg,rinfo) { console.log("Received message"+ msg.toString()); }); server.bind(9000);
And… that’s it. A perfectly functioning UDP server, not that it does much yet. To run the code, in a command prompt, change to the directory you saved server.js to and simply type “node server.js”. To stop node from running, press CTRL + C twice.
dgram is a built in Node library for creating datagram sockets. When we create the socket with tell it to use udp4, that is to say UDP connection for IP v 4. Then we add an on “message” handler that for now simply echos whatever data it receives.
Now lets make a C++ client to talk to our server. If you are unfamiliar with how to configure SFML, take a look at part 1 of my C++ with SFML tutorial. In this case we aren’t going to need to link the graphics or audio libraries, which greatly cuts down the size of our project. If you have trouble setting up a project or simply don’t want to, you can download a pre-configured project here. Simply open the solution and run.
Once you have created and configured a new project, lets add our code. In my case I created a file called Scoreboard.cpp and added the following code.
#include "SFML/Network.hpp" int main(int argc, char* argv[]) { if(argc <2) return-1; sf::IPAddress ip("127.0.0.1"); sf::SocketUDP socket; sf::Packet packet; packet.Append(argv[1],strlen(argv[1])); socket.Send(packet,ip,9000); return0; }
Extremely simple code again. The app is simply going to send a string you specify on the command line over a UDP socket, so first we check to make sure you specified a string. Then you create the IP address that represents your server’s location. In this case you are using 127.0.0.1 which is a special reserved IP address called a loopback, which basically means “this machine”. In an actual production environment, you would use an external IP address or DNS entry like “gameserver.mydomain.com”.
Next we declare our Socket and Packet. Think of a Packet as the “stuff” we are sending across the wire. Next we fill that picket with the string the user passed in on the command line. The Socket represents the connection to the remote server. When we say socket.Send() we are saying send packet, on ip IpAddress using port 9000. Finally we simply exit.
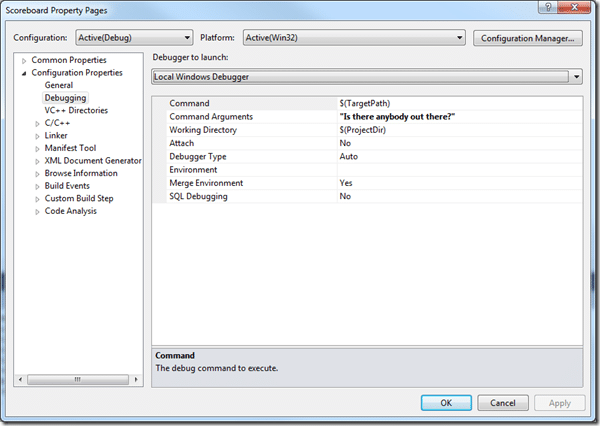
You can now run this from the command line using ScoreBoard.exe “The text you want to send” <—The quotes are critical, or it will end up looking like multiple parameters instead of a single string. Additionally you could specify the string in your debug settings, then you can simply press F5 to run your code. To set this value, right click your solution and select Properties, then on the left hand side choose “Command Arguments” and specify your string (quoted again ) there, like this:
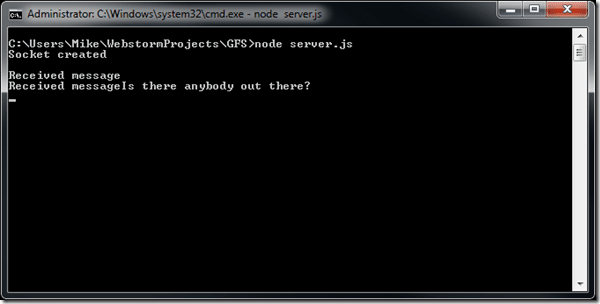
Now your primitive client and server are up and running. Start your server first. Open a command prompt, CD to the directory you created server.js in and type “node server.js” ( no quotes ). Note, if you didn’t set your PATH to include the path to nodejs, this wont work and instead you will have to fully resolve the path to node. Now run your SFML application, either using F5 if you specified a Command Argument, or from the command line.
Now you should see:
Congratulations! You just created a fully function client and server! You may have noticed we actually received two socket connections there, an empty one, then our string. What’s going on here? Well, SFML sends Packets in two parts, the first contains only the size, the second contains the actually data. Why? Beats me. Not really a big deal, as you will soon see.
Now, in the next part we will actually make them do something!
Click here to download the pre-configured Visual Studio project.
Click here to download Server.js.


