In Part 1 we covered creating and displaying our UI. Now we are going to do something with it. We are going to cover quite a bit of different material in this tutorial. First and foremost we are going to need a server to talk to, lucky enough, I already have one!
That tutorial series was about creating a high score server using Node, then consuming it from a C++ SFML app. We are going to reuse the server logic from that tutorial. If you have zero experience with Node, I recommend you read it, just ignore the C++ bits, we will cover them here. If you don’t care about Node at all, simply download and save server.js as well as HighScores.txt.
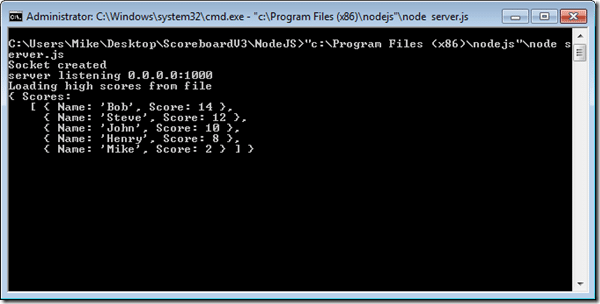
Then all you need to do is download and extract node, once extracted at a command line run change to the node directory and run node.exe c:pathtowhereyousaveserver.js, and your server is up and running, like such:
Press CTRL + C to exit.
Let’s take a quick look at Server.js
var dgram = require('dgram'), fileSystem = require('fs'), highScores, server; //Load high scores from file fileSystem.readFile("HighScores.txt", 'utf8', function(err,data){ if(err){ //Error occurred loading file, spit out error message then die console.log("Error occurred loading file"); process.exit(); } console.log("Loading high scores from file"); try{ // use JSON to turn file contents back into a Javascript array object highScores = JSON.parse(data); }catch(e) { // Exception occurred parsing file contents as JSON, error out and die. console.log("Exception occured parsing data"); process.exit(); } // Now sort the high scores by score, high to low highScores.Scores.sort(function(a,b){ return b.Score - a.Score; }); // Display the sorted high scores to the console console.log(highScores); }); //Create a UDP socket server = dgram.createSocket('udp4'); console.log("Socket created"); // Add a handler for incoming traffic on the socket. This will be called each time something connects to the socket server.on("message",function (msg,rinfo) { //console.log(parseInt(msg).toString()); console.log(rinfo); // SFML sends two packets, one with the size of the following packet ( as a 4 byte number ) // We don't need it, so as a crude-hack, we ignore any 4 byte packets if(rinfo.size != 4) { console.log("Received message:" + msg.toString()); // Socket data comes in as a JSON encoded array of objects, turn back into a JS object var jsonData,i; try{ jsonData = JSON.parse(msg); } catch( exception ) { console.log("Invalid JSON request received"); return; // Non lethal error, just stop processing packet } // The action parameter determines what you should do with this packet switch(jsonData.action) { // action==AddScore, add the score to the highscore array if it's higher than an existing score case "AddScore": console.log("AddScore calledn"); // Make sure highscore has been initialized... order can be a weird thing in node if(highScores != undefined){ // Loop through current highScores ( which should be sorted ) // and insert score if a lower match found for(i=0;i < highScores.Scores.length;++i) { if(highScores.Scores[i].Score < jsonData.score){ highScores.Scores.splice(i,0,{"Name" : jsonData.name, "Score" : jsonData.score}); console.log("Inserted highscore by: " + jsonData.name); break; // match found, stop looping } } } // Display newly created highscore array console.log(highScores.Scores); break; case "GetScores": console.log("Get Scores called"); // Turn highscores back into a JSON encoded string var highScoreAsString = JSON.stringify(highScores); // Create a buffer to hold that string var responseBuffer = new Buffer(highScoreAsString.length); // Write the string to the buffer responseBuffer.write(highScoreAsString); // Send it back to the client, using the addressing information passed in via rinfo server.send(responseBuffer,0,responseBuffer.length,rinfo.port,rinfo.address, function(err, sent){ if(err) console.log("Error sending response"); else console.log("Responded to client at " + rinfo.address + ":" + rinfo.port ); }); break; } } // // }); // Called when socket starts listening for packets. besides logging, currently serves no purpose server.on("listening", function () { var address = server.address(); console.log("server listening " + address.address + ":" + address.port); }); // Finally, bind the server to port 1000. 1000 was randomly chosen. Think of this as saying GO! // Now we are listening for UDP connections on port 1000 server.bind(1000); // Now, lets show off a bit, with the worlds simplest web server. // Dynamically creates webpage showing current high scores. var webServer = require('http'); webServer.createServer(function(req,res){ res.writeHead(200, {'Content-Type': 'text/html'}); res.write("<html><body><h1>High Scores</h1><ul>"); for(i=0;i < highScores.Scores.length;++i) { res.write(highScores.Scores[i].Name + " " + highScores.Scores[i].Score + "<br />"); } res.write("</ul></body></html>"); res.end(); }).listen(80);
The code is pretty well commented as to what it does. For more details, read all three parts of the prior tutorial.
Now that we have our server up and running, we need to communicate with it. As you may have noticed, the server made heavy use of JSON, which is a simple Javascript based data markup format. This is the format we are going to send and receive our data in.
Here for example, is the simple JSON we are going to create for a Add High Score request:
{ "action":"AddScore", "name":"Mike","score":90210}
Normally there is a JSON serializer bundled with the .NET framework, unfortunately it hasn’t been included in the PlayStation Suite SDK, so we need one. Fortunately there is a very simple one available, the aptly named simple-json. We actually only need to download a single file, SimpleJson.cs. Download that file and save it somewhere.
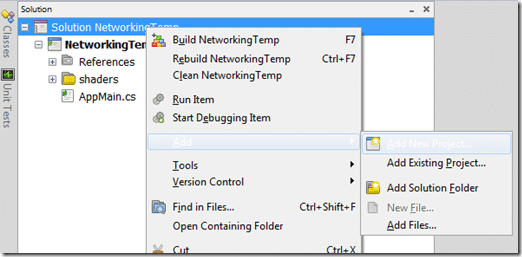
We could simply add the cs file to our project, but I find it a bit cleaner to put it into a library of it’s own, so that is what we are going to do. In PlayStation Suite, right click your solution and select Add->Add New Project:
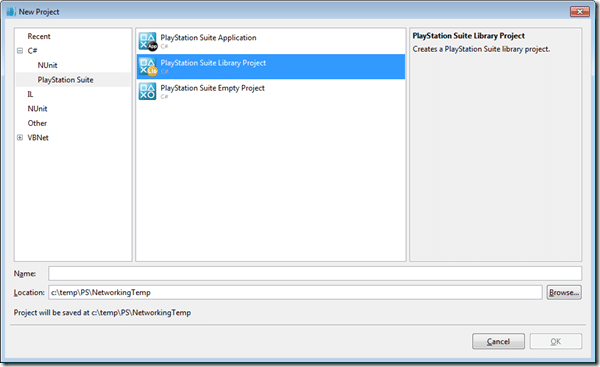
In the resulting dialog, on the left hand panel select C#->PlayStation Suite, then in the middle pane select PlayStation Suite Library Project, finally name it and click OK. I went with the name JSON.
Make certain you select a PS Suite library project, an ordinary library will not work!
Now that we have our newly created library, we need to add the SimpleJson.cs file we downloaded. Simply right click your JSON project, select Add Files, and select SimpleJson.cs. Now that the file has been added, right click the JSON project and choose Build JSON. It should compile without error.
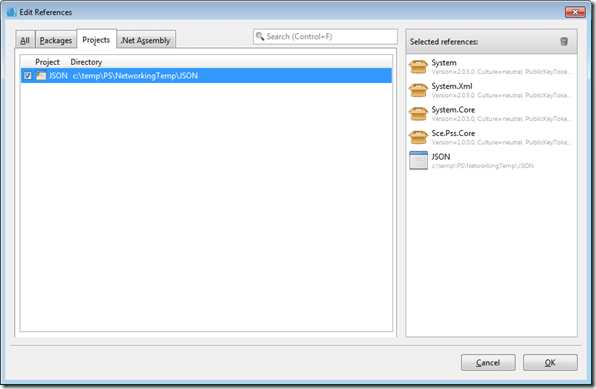
We now need to add a reference to the JSON project to our Networking project. Expand Networking, right click References and select “Edit References…”
In the resulting dialog, switch to the Projects tab then click the checkbox next to JSON, finally click the OK button.
Our project can now access the SimpleJson class. Now we have to wire-up our app so the UI actually does something. Open up MainWindow.cs and change it as follows:
using System; using System.Collections.Generic; using Sce.Pss.Core; using Sce.Pss.Core.Imaging; using Sce.Pss.Core.Environment; using Sce.Pss.HighLevel.UI; using System.Net; using System.Net.Sockets; namespace HighScoreApp { public partial class MainWindow : Scene { public class ScoreEntry { public string Name; public int Score; } public class ScoreArray { public IList<ScoreEntry> Scores { get; set; } } public MainWindow() { InitializeWidget(); buttonAddScore.ButtonAction += delegate(object sender, TouchEventArgs e) { Dictionary<string,object> jsonRequest = new Dictionary<string, object>(); jsonRequest["action"] = "AddScore"; jsonRequest["name"] = textBoxName.Text; jsonRequest["score"] = Int32.Parse(textBoxScore.Text); // No error handling, will blow up easily, use tryparse string jsonObj = SimpleJson.SimpleJson.SerializeObject(jsonRequest); labelResults.Text = jsonObj; using(Socket sock = CreateOpenSocket()){ sock.Send(System.Text.Encoding.UTF8.GetBytes(jsonObj)); sock.Shutdown(SocketShutdown.Both); sock.Close(); } }; buttonGetScores.ButtonAction += delegate(object sender, TouchEventArgs e) { var jsonRequest = new Dictionary<string, object>(); jsonRequest["action"] = "GetScores"; jsonRequest["name"] = ""; jsonRequest["score"] = 0; string jsonString = SimpleJson.SimpleJson.SerializeObject(jsonRequest); using(var sock = CreateOpenSocket()) { sock.Send(System.Text.Encoding.UTF8.GetBytes(jsonString)); byte[] buffer = new byte[1024]; sock.Receive(buffer); string responseJSON = System.Text.UnicodeEncoding.ASCII.GetString(buffer); var results = SimpleJson.SimpleJson.DeserializeObject<ScoreArray>(responseJSON); foreach(var score in results.Scores) { labelResults.Text += score.Name + " " + score.Score.ToString() + "rn"; } sock.Shutdown(SocketShutdown.Both); sock.Close(); } }; } private Socket CreateOpenSocket() { String client_name = Dns.GetHostName(); IPHostEntry client_host = Dns.GetHostEntry(client_name); IPAddress client_ip = client_host.AddressList[0]; IPEndPoint endpoint = new IPEndPoint(client_ip, 1000); var sock = new System.Net.Sockets.Socket( System.Net.Sockets.AddressFamily.InterNetwork, System.Net.Sockets.SocketType.Dgram, System.Net.Sockets.ProtocolType.Udp); sock.Connect(endpoint); return sock; } } }
The first thing we added was the System.Net and System.Net.Sockets using statements, we need these for the networking calls we are going to perform. Next we declare a pair of really simple classes, ScoreEntry and ScoreArray. Although JSON is passed around as strings, it needs to be mapped back to usable C# objects. Our network call is going to return an array of Scores, so we need to have a corresponding C# datatype for SimpleJson to deserialize to.
Next up is our constructor, its very critical that you keep InitializeWidget() where it is. This method is what causes the generated code in MainWindow.designer.cs to execute, and this is where all of our various buttons, labels and text boxes are defined. Be sure to call InitializeWidgets before you use any of those widgets!
Now we want to wire up our two buttons to actually do something when clicked. You could use an ON_click style method, but I instead went inline with an anonymous method. First we create a Dictionary object that is going to be translated into our JSON request string. It’s merely a set of name value/pairs representing the name, high score as well as the action we want to perform. As you can see, we get the values from our two EditableText widgets, and if you named them differently in designer, you need to update the variable name here accordingly. Notice in this example I have ZERO hardening, so if you pass invalid values, things will go horribly wrong.
Now that we have created our Dictionary of key/value pairs, we pass it to SimpleJson.SerializeObject, which then turns it into an JSON string. Just for debugging purposes, we display the resulting string to our labelResults. Now we actually make the network request. To simplify things a bit, and make the code reusable we created the CreateOpenSocket method, which creates an socket and connects to it. We will see this method in a moment, again notice the lack of error handling, bad me!
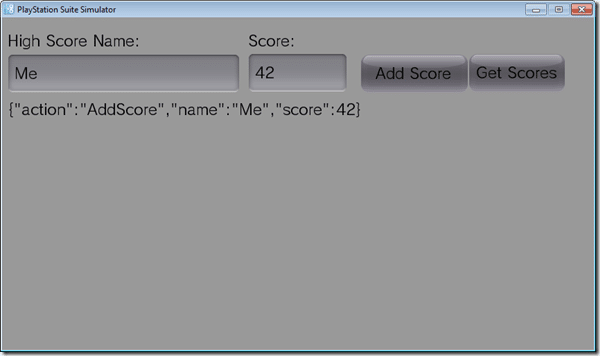
Once our socket is created, we convert our string to raw bytes and send them across the socket. At this point, we are done with it, so we shut it down and close it. It’s pretty easy to leak ports, so be careful about shutting down your sockets when you are done with them. At this point, you can now send high score requests to the server, like such:
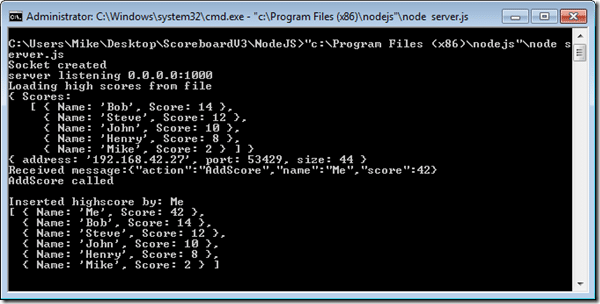
Fill in a value for name and score, then click Add Score, if everything went right, you should see the JSON string that we passed across the network displayed below our form. Additionally, if you tab over to your node command window, you should see:
This shows that your score was received, sorted and added to the high score list on the server. Now lets look at the code behind the GetScores button, you will see that much of it is identical. Again we start by making a Dictionary for our JSON request object, the format is identical, but in this case the action is GetScores, and the name and score values don’t matter ( although they need to be there ). Again we serialize to a JSON string and create a UDP socket using CreateOpenSocket().
This time though, we are waiting for a reply. We send our socket just like before, but this time we call Receive() after. Again, there is no error handling and receive will block your thread preventing execution until finished, in a production environment, you would make things much more tolerant.
Receive takes a byte buffer into which to copy the data that it is received. When you run the Simulator, you may get a firewall prompt, make sure you allow it, or you will never get a response here even though you are connecting on the local machine. The contents of that buffer are actually just an ASCII string of JSON code, so we simply decode it back to a string.
We then take that JSON string and deserialize it, this is where we make use of those two simple classes we defined before, they are the format SimpleJson will deserialize the string into. After running DeserializeObject, results will contain a ScoreArray, which is simply a List<> of ScoreEntry. We simply loop through the ScoreEntrys and display the name and score out to our labelResults. Finally, just like before, we clean up after ourselves and shutdown the socket.
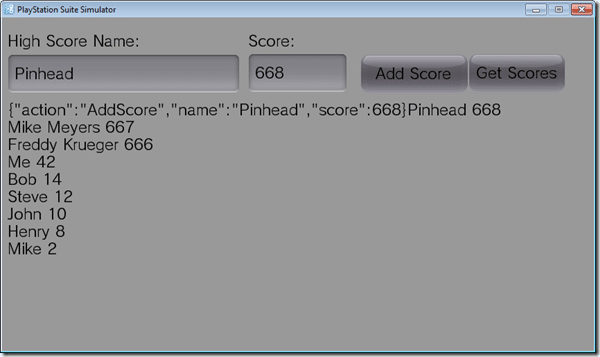
Now if you run the code and click the GetScores button, the high scores list will display, including any scores you added using the AddScore button. These scores will last until you shut down server.js.
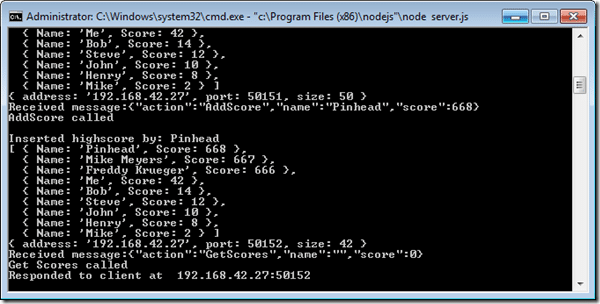
And if you flip over to node, you will see:
Finally, we look at the CreateOpenSocket() method. This is straight .NET code and has nothing at all to do with PS SDK. First we need the DNS value of the server we are connecting to. Generally it would be something like “someserver.com”, but since we are running client and server on the same machine, we want our own host name. We then take that host name and DNS resolve it to an IP address, which is a two step process. Then we take the resulting IPAddress entry and create an IPEndPoint. The 1000 value is the port to connect on. This value was hard coded in the server.js file. If for some reason you want to connect on a different port, you need to change this line:
server.bind(1000);
in server.js. Next we create our actual socket, in this case UDP. Why did we use UDP instead of TCP? No reason really. TCP is more reliable but a bit slower, but guarantees in order response. None of this matters to use here, so I used UDP. You can change to TCP by changing a single line here and in server.js. Finally we connect to our socket and return it. It is the responsibility of the caller to close the open socket down.
Now, you have a fully functional networked GUI based highscore client and server.
You can download the complete sources here. That archive includes the Node scripts, so all you need is to download Node in order to run it.

