Gamefromscratch has a long running series taking an indepth look at various game engines available. Today we are going to look at the Godot game engine, an open source C++ based game engine with a complete Unity-esque world editor. Godot runs on Windows, Linux and Mac platforms and can target all of those, plus iOS, Android, PS3 and PS Vita, NaCL with HTML5 and Windows Phone both being in development.
In Godot’s own words:
Godot is an advanced, feature packed, multi-platform 2D and 3D game engine. It provides a huge set of common tools, so you can just focus on making your game without reinventing the wheel.
That description is incredibly apt as well, you will certainly be surprised by just how many tools are included. Now let’s jump right in!
There is a video on this post available here (and embedded at bottom of the page) which goes in to a bit more detail.
The Editor
You get started with Godot by downloading the executable from the downloads page. You probably expect this to be an installer, but you would be wrong. Instead when you run it you get the Project Manager:
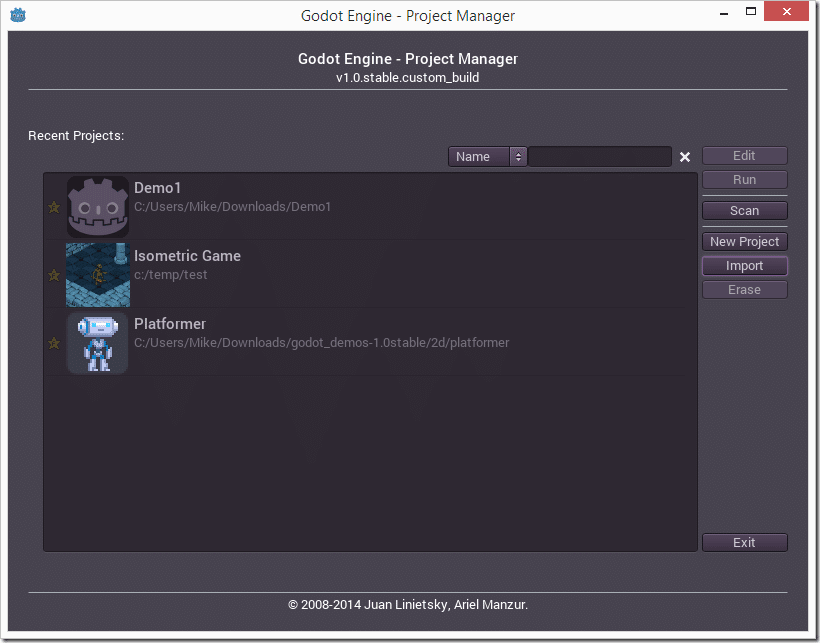
Here you can either create a new project or load an existing one. Finally once you’ve selected or created, you are brought to the editor:
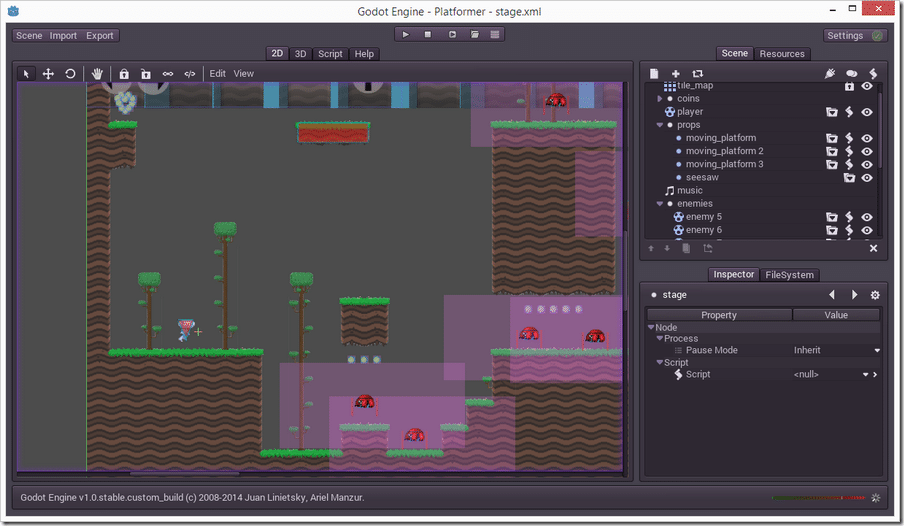
This is where the magic happens. The above screenshot is of the Platformer demo being edited. The left hand window is where your scene is composed. As you can see from the four tabs above, you can work in 2D, 3D, Script editing or browse the built in help in this window. The top left icons are actually menus and a lot of the functionality and tools are tucked away behind Scene and Import.
The top right hand dialog is your scene graph:
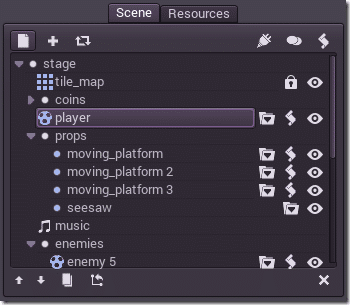
Here you can see ( and create/instance ) the items that make up your world. Simply click the New Icon to add a new items to the world, or the + Icon to add a new instance instead. The other icons are for wiring scripts and signals (events) up to the objects in your world.
Below the scene graph, you’ve got the Inspector window, which enables you to set properties of objects in your scene. As you can see from the screen shot, Godot takes a very modular/component approach which is quite popular these days:
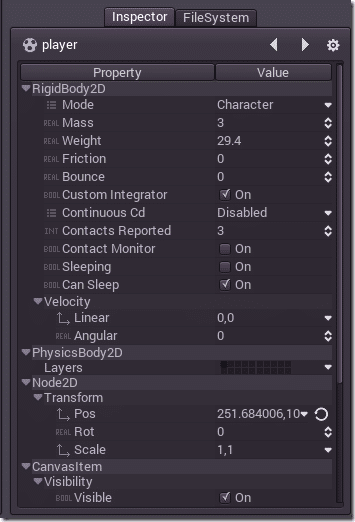
This enables you to visual inspect and edit properties of your game objects. It also represents one of the first flaws of Godot… some of the controls are just awkward to use. For example if you don’t hit enter after editing a text property, the values are lost. Additionally modifying numeric fields can be a pain in the ass at times. It’s all stuff that can be fixed with time ( Godot was only open sourced about a year ago after all ) but for now its clunky and somewhat annoying.
Coding
So that’s the visual editor… what about code?
Well the majority of your programming is going to be done in GDScript, using the included editor. GDScript is a Python-esque proprietary scripting language. I don’t generally like this approach as it makes all the existing tools and editors worthless, lose the years of bug fixing, performance improvements, etc… while forcing a learning curve on everyone that wants to use the engine. That said, the idea behind a scripting language is they should be easy to use and learn.
The authors explained their decision in the FAQ:
The short answer is, we’d rather a programmer does the small effort to learn GDScript so he or she later has a seamless experience, than attracting him or her with a familiar programming language that results in a worse experience. We are OK if you would rather not give Godot a chance because of this, but we strongly encourage you to try it and see the benefits yourself.
The official languges for Godot are GDScript and C++.
GDScript is designed to integrate from the ground to the way Godot works, more than any other language, and is very simple and easy to learn. Takes at much a day or two to get comfortable and it’s very easy to see the benefits once you do. Please do the effort to learn GDScript, you will not regret it.
Godot C++ API is also efficient and easy to use (the entire Godot editor is made with this API), and an excellent tool to optimize parts of a project, but trying to use it instead of GDScript for an entire game is, in most cases, a waste of time.
Yes, for more than a decade we tried in the past integrating several VMs (and even shipped games using them), such as Python, Squirrel and Lua (in fact we authored tolua++ in the past, one of the most popular C++ binders). None of them worked as well as GDScript does now.
More information about getting comfortable with GDScript or dynamically typed languages can be found here.
That covers the why anyways, now let’s look at the language itself. As I said earlier, it’s a Python like (whitespace based) scripting language. Let’s look at an example from the included demos:
extends RigidBody2D


const STATE_WALKING = 0
const STATE_DYING = 1

var state = STATE_WALKING
var direction = -1
var anim=""
var rc_left=null
var rc_right=null
var WALK_SPEED = 50

var bullet_class = preload("res://bullet.gd")

func _die():
   queue_free()

func _pre_explode():
   #stay there
   clear_shapes()
   set_mode(MODE_STATIC)
   get_node("sound").play("explode")


func _integrate_forces(s):

   var lv = s.get_linear_velocity()
   var new_anim=anim

   if (state==STATE_DYING):
      new_anim="explode"
   elif (state==STATE_WALKING):

      new_anim="walk"

      var wall_side=0.0

      for i in range(s.get_contact_count()):
         var cc = s.get_contact_collider_object(i)
         var dp = s.get_contact_local_normal(i)

         if (cc):


            if (cc extends bullet_class and not cc.disabled):
               set_mode(MODE_RIGID)
               state=STATE_DYING
               s.set_angular_velocity(sign(dp.x)*33.0)
               set_friction(true)
               cc.disable()
               get_node("sound").play("hit")

               break


         if (dp.x>0.9):
            wall_side=1.0
         elif (dp.x<-0.9):
            wall_side=-1.0

      if (wall_side!=0 and wall_side!=direction):

         direction=-direction
         get_node("sprite").set_scale( Vector2(-direction,1) )
      if (direction<0 and not rc_left.is_colliding() and rc_right.is_colliding()):
         direction=-direction
         get_node("sprite").set_scale( Vector2(-direction,1) )
      elif (direction>0 and not rc_right.is_colliding() and rc_left.is_colliding()):
         direction=-direction
         get_node("sprite").set_scale( Vector2(-direction,1) )


      lv.x = direction * WALK_SPEED

   if( anim!=new_anim ):
      anim=new_anim
      get_node("anim").play(anim)

   s.set_linear_velocity(lv)


func _ready():
   rc_left=get_node("raycast_left")
   rc_right=get_node("raycast_right")
As someone raised on curly braces and semi colons it can take a bit of time to break muscle memory, but for the most part the language is pretty intuitive and easy to use. You can see a quick language primer here.
Remember earlier I said the code editor was built into the engine, let’s take a look at that now:
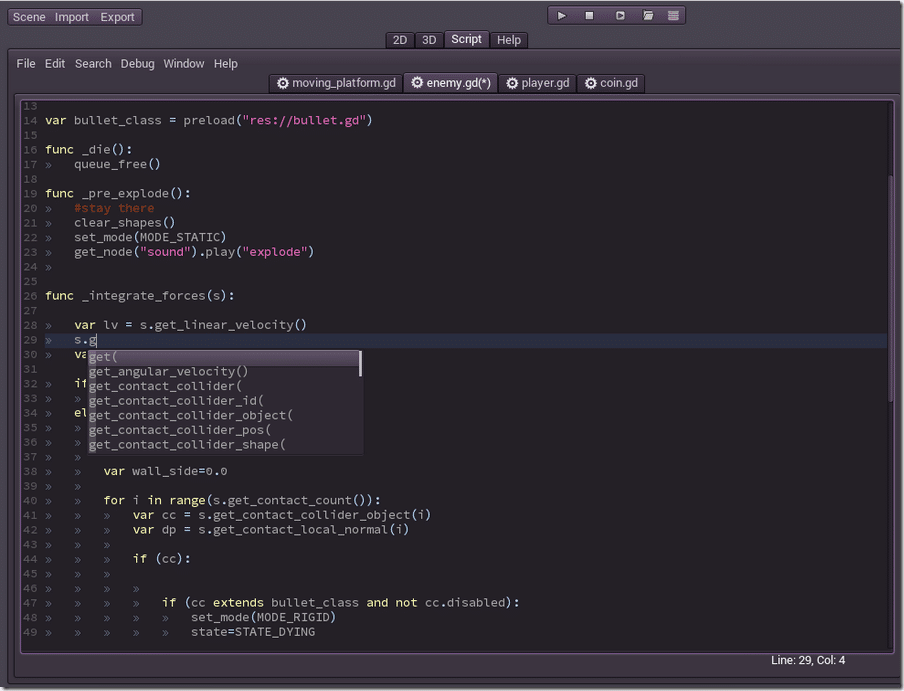
As you can see, the editor does provide most of the common features you would expect from an IDE, a personal favorite being auto-completion. Features like code intention, find and replace and auto indention are all available, things often missing from built in editors. Like dealing with the Inspector window though their can be some annoyances, like the autocomplete window appearing as you are trying to cursor around your code, requiring you to hit Escape to dismiss it. For the most part though the editing experience is solid and hopefully some of the warts disappear with time.
Now perhaps the biggest deal of all:
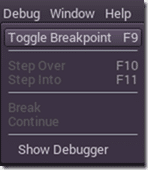
Debugging! This is where so many home made scripting languages really suck, the lack of debugging. Not Godot:
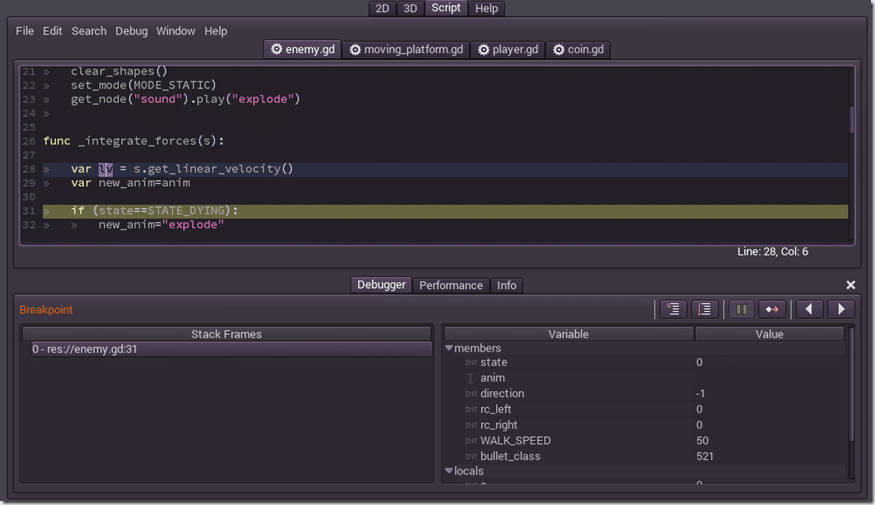
You can set breakpoints, step into/over your running code and most importantly inspect variable values and stack frames. Once again, it’s the debugging experience that often makes working in scripting languages a pain in the ass, so this is nice to see!
Hey, What about C++???
Of course, one of the big appeals of Godot is going to be the C++ support, so where exactly does that come in? Well first and most obviously, Godot is written in C++ and fully open source under the MIT license ( a very very very liberal license ), so you can of course do whatever you want. I pulled the source from Github and built without issue in Visual Studio 2013 in just a few minutes. The build process however is based around Scons, which means you have to Python 2.7x and Scons installed and configured, but neither is a big deal.
What about extending Godot, that is what the majority of people will want to do. Well fortunately it’s quite easy to create C++ extensions, although again you need Scons and have to do a bit of configuration, but once you’ve done it once assuming you’ve got a properly configured development environment the process should be quick and mostly painless. From the wiki page here is a sample C++ module:
Sumator.h
/* sumator.h */
#ifndef SUMATOR_H
#define SUMATOR_H

#include "reference.h"

class Sumator : public Reference {
    OBJ_TYPE(Sumator,Reference);

    int count;

protected:
    static void _bind_methods();
public:

    void add(int value);
    void reset();
    int get_total() const;

    Sumator();
};

#endif
Sumator.cpp
/* sumator.cpp */
#include "sumator.h"
void Sumator::add(int value) {
    count+=value;
}

void Sumator::reset() {
    count=0;
}
int Sumator::get_total() const {
    return count;
}
void Sumator::_bind_methods() const {
    ObjectTypeDB::bind_method("add",&Sumator::add);
    ObjectTypeDB::bind_method("reset",&Sumator::reset);
    ObjectTypeDB::bind_method("get_total",&Sumator::get_total);
}
Sumator::Sumator() {
    count=0;
}
Then in your script you can use it like:
var s = Sumator.new()
s.add(10)
s.add(20)
s.add(30)
print( s.get_total() )
s.reset()
If you inherit from Node2D or a derived class, it will be available in the editor. You can expose properties to the inspector and otherwise treat your module like any other Node available. Remember though, for productivity sake, you should really only be dropping to C++ as a last resource. It is however quite simple to do.
Nodes, Nodes and more Nodes
At the heart of Godot, the world is essentially a tree of Nodes, so I suppose it’s worthwhile looking at some of the nodes available and how they work. From the scene graph window, you add a new node to the world using this icon:
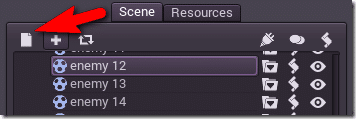
Next it’s a matter of picking which type, which could of course include modules you created yourself in C++.
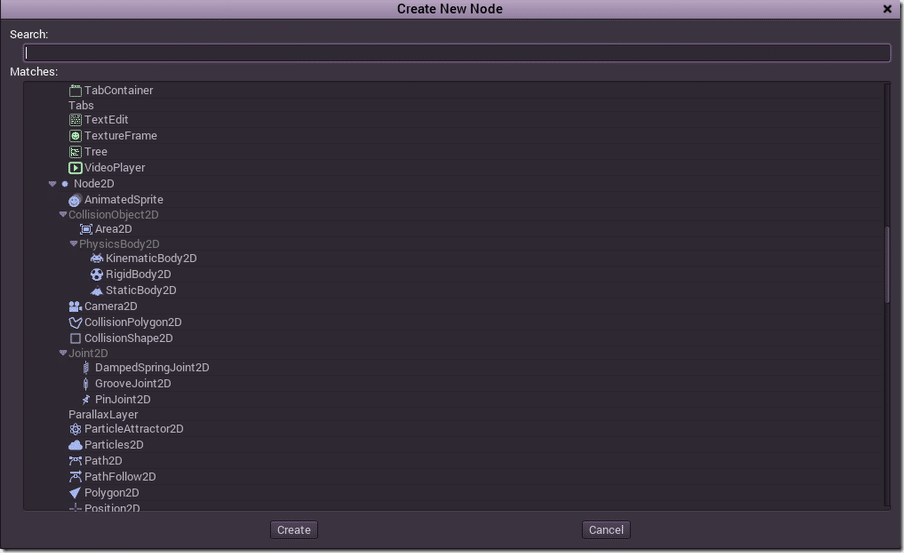
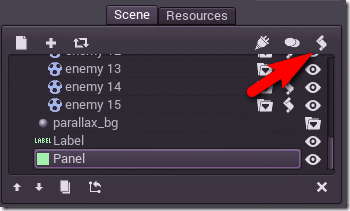
As you can see from the small portion I’ve shown above, there are a LOT of built in nodes already available. From UI controls, to physics controllers, path finding and AI tools, bounding containers, video players and more. Essentially you create your game by composing scenes, which then are composed of nodes. Once you’ve created a node you can then script it. Simply select your node in the scene graph and then click the script icon:
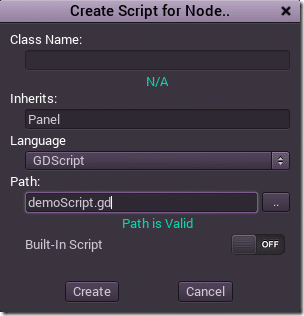
Then a New Script dialog will be displayed:
And your script will be created:
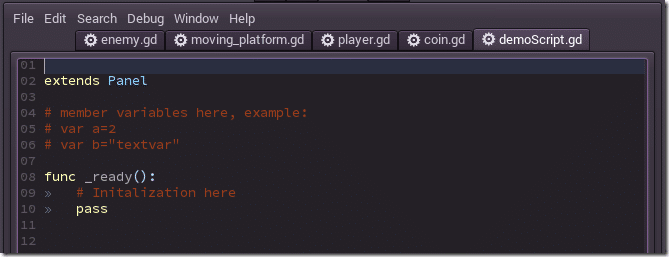
As you can see, the script itself inherets from the node type you selected. You can now script any and all logic attached to this particular Node. Essentaily your game logic is implemented here.
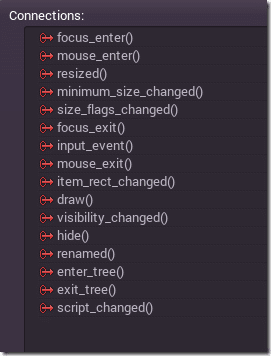
In addition to wiring up scripts to game nodes, you can also wire up Signals.
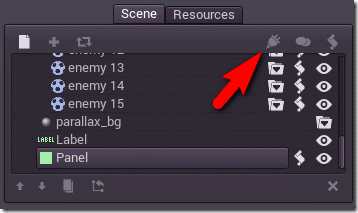
Signals can be thought of as incoming events:
HELP!
So, what about Help then? Well this is both a strength and weakness of Godot. As you saw earlier, there is actually an integrated help tab. You can look it up any time, or use press SHIFT + F1 while coding to get context sensitive help:
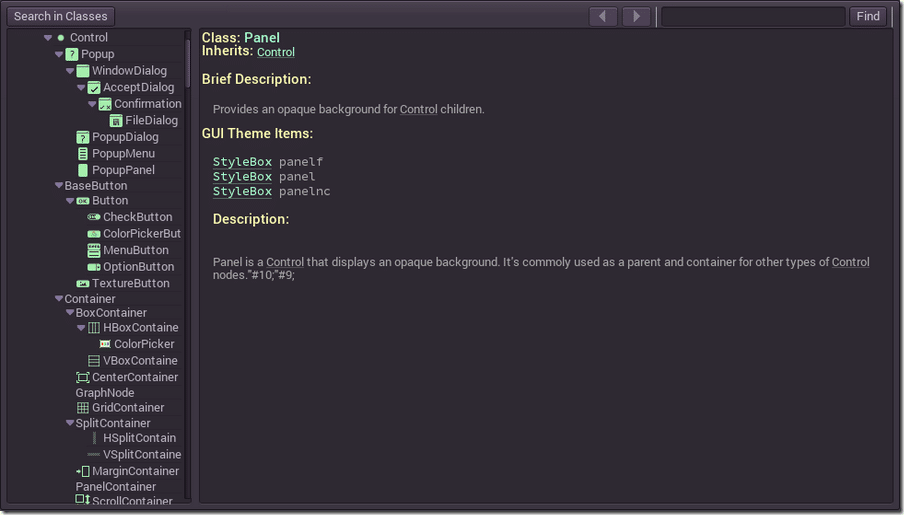
It’s invaluable, but unfortunately the resulting help file is often just a listing of methods/parameters and nothing more. I often instead just keep the class reference from the Wiki open in a browser window. For an open source project, the reference is pretty good, but it could still certainly use a lot more love.
Next are the tutorials, there’s a fairly good selection available on the Wiki but I think a good in-depth beginner series is really needed. To someone that just downloaded Godot and is thinking “now what”… that presents a challenge. That said, I will probably be creating one, so this shouldn’t be an issue in time!
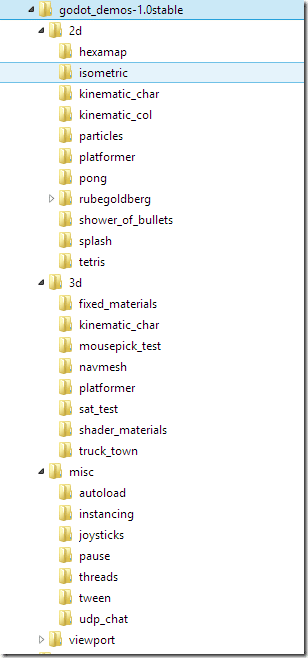
Finally, and perhaps most valuably, there are several demos included:
Publishing
So, once you’ve finished your game, how do you publish it to the various available platforms? Well for starters you click the Export button:
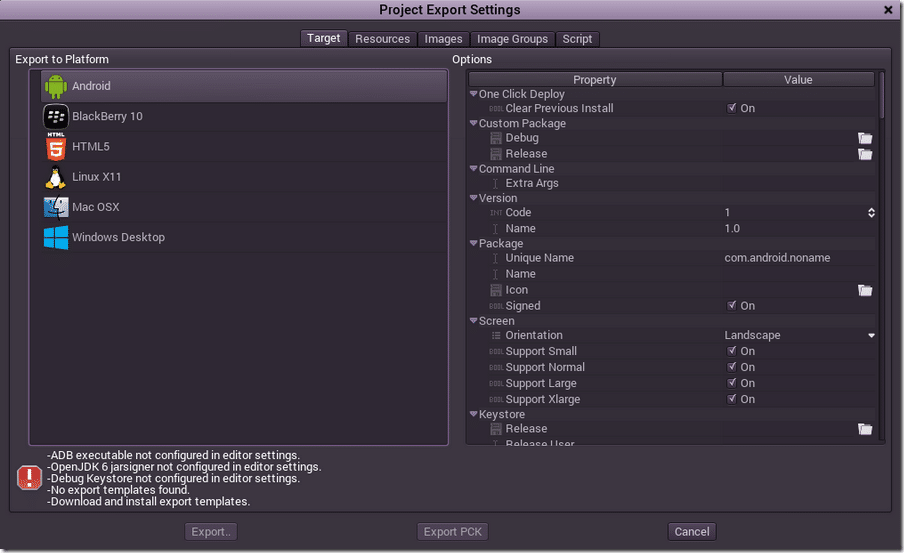
You also need an export template, which is available from the Godot downloads site. Additionally you need to configure the tool chain for each platform, such as the Android SDK for Android, XCode for iOS ( and a Mac! You can’t end run around the needing a Mac for iOS development requirement unfortunately), etc. But the process is spelled out for you and they make it pretty easy.
Summary
I haven’t even really touched upon the plethora of tools tucked away in the editor… need to import a font, there’s a tool for that. There’s an improved Blender COLLADA plugin which just worked when I tried it. There’s a tool for mapping controls to commands, there are tools for compressing and modifying textures on import, for modifying incoming 3D animations, etc… Basically if you need to do it, there is probably a tool for it shoved in there somewhere.
On the other hand, the process itself can be pretty daunting. Figuring out how to get input, a script’s life cycle etc isn’t immediately obvious. It really is an engine you have to sit down with and just play around. Sometimes you will hit a wall and it can be pretty damned frustrating. However, it’s also a hell of a lot of fun and once it starts to click it is a great engine to work in.
I definitely recommend you check out Godot, especially if you are looking for an open source Unity like experience. That said, calling this a Unity clone would certainly be doing it a disservice, Godot is a great little game engine on it’s own accord that deserves much more exposure.
The Video Version
Click here for the full resolution 1080p version.
