Over on the PlayStation Mobile forums, a user asked:
For example, if I had a 100 x 100 image, I could use the source rectangle to draw, say, the left part of the image 50 x 100. This is useful when I have two images that represent the same object, e.g. a fancy progress meter, one light, the other dark. SpriteUV has Quad which allows me to stretch and skew the image, but not crop.
Am I missing something? If not, what are my options?
My answer wasn’t a short one, so I decided to essentially turn it in to a tutorial post in and of itself. So, if you want to learn how to do this, or how UV coordinates work in the first place, read on!
The answer is, yes, you can very much do this with PSM Studio, but the way might not be completely intuitive. Each sprite has a TRS set ( Translation/Rotation/Scale ) that represents its UV coordinates within its textures. Essentially when you work with a SpriteTile, it’s handling all this magic for you. The good news is, you can manipulate the UV values of a SpriteUV to accomplish exactly the effects described in the question above. If what you are looking to do is create a sprite sheet animation however, there is a much better way.
Alright, let’s jump right in with some code:
using System; using Sce.PlayStation.Core; using Sce.PlayStation.Core.Graphics; using Sce.PlayStation.Core.Input; using Sce.PlayStation.HighLevel.GameEngine2D; using Sce.PlayStation.HighLevel.GameEngine2D.Base; namespace Test { public class AppMain { public static void Main (string[] args) { Director.Initialize(); Scene scene = new Scene(); scene.Camera.SetViewFromViewport(); SpriteUV sprite = new SpriteUV(new TextureInfo("/Application/watch.png")); sprite.Scale = new Vector2(Director.Instance.GL.Context.Screen.Width, Director.Instance.GL.Context.Screen.Height); sprite.Schedule((dt) => { var g = GamePad.GetData(0); if((g.Buttons & GamePadButtons.Up) == GamePadButtons.Up){ // Top left sprite.UV.S = new Vector2(0.5f,0.5f); sprite.UV.T = new Vector2(0.0f,0.5f); } else if((g.Buttons & GamePadButtons.Left) == GamePadButtons.Left){ // Bottom left sprite.UV.S = new Vector2(0.5f,0.5f); sprite.UV.T = new Vector2(0.0f,0.0f); } else if ((g.Buttons & GamePadButtons.Down) == GamePadButtons.Down){ // Bottom right sprite.UV.S = new Vector2(0.5f,0.5f); sprite.UV.T = new Vector2(0.5f,0.0f); } else if ((g.Buttons & GamePadButtons.Right) == GamePadButtons.Right){ // Top right sprite.UV.S = new Vector2(0.5f,0.5f); sprite.UV.T = new Vector2(0.5f,0.5f); } else if((g.Buttons & GamePadButtons.Cross) == GamePadButtons.Cross){ // Back to full screen sprite.UV.S = new Vector2(1.0f,1.0f); sprite.UV.T = new Vector2(0.0f,0.0f); } },0); scene.AddChild(sprite); Director.Instance.RunWithScene(scene); } } }
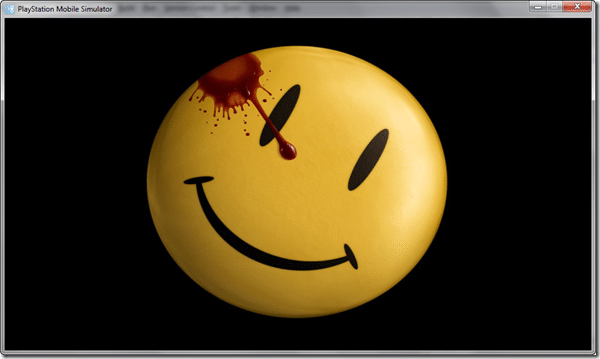
Run this code and you will see:
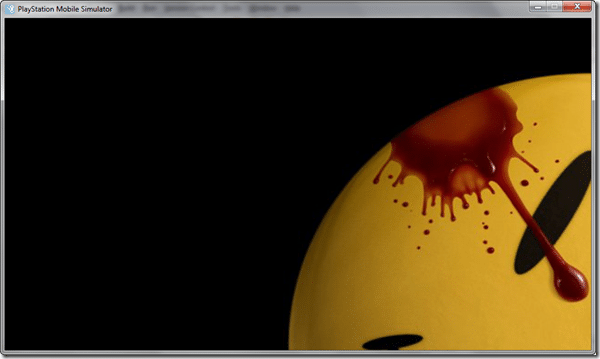
Now press an arrow key ( here is the results for UP ) and you will see a fraction of the original texture:
Press X to go back to the full texture dimensions.
So… what’s happening here?
First off, we Initialize our Director singleton, create a Scene and set the camera up to match the device screen dimensions. We then create a SpriteUV and TextureInfo in a single line, loading an image of the famous Watchmen logo. We then scale the sprite to also match the dimensions of the screen.
It’s in the Schedule lambda the bulk of our UV manipulation logic takes place. As you can see, we get the GamePad state, and handle the user pressing the d-pad or X button ( S key on simulator ). In the event the user presses a direction button, we manipulate the sprite’s UV.S and UV.T values depending on which direction the user pressed, as indicated by the comment in each if statement. If the user presses the X button, we set the UV.S and UV.T values back to full size and the origin respectively. Finally we add the sprite to the scene, then run the scene.
The heart of this example is the UV property, which is a TRS object. If the term UV is unfamiliar to you, they are simply texture coordinates on a face. They are called UV simply because there are two coordinates, U and V. The UV values describe how a texture is mapped to a polygon face. U and V values go from 0 to 1 and start in the bottom left corner of an image. This means (0,0) is the bottom left corner of the texture, (1,1) is the top right coordinate of the texture while (0.5,0.5) is the very center of the texture.
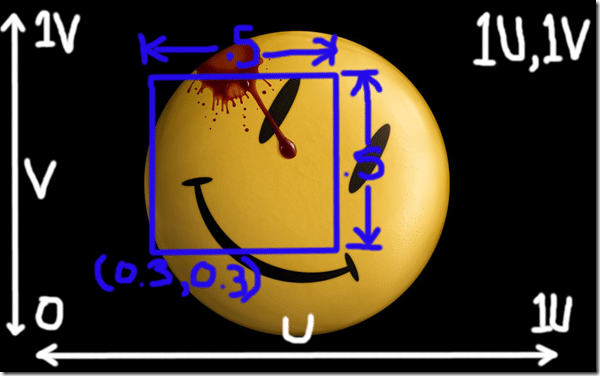
So, using the SpriteUV.UV property, we can alter the Translation ( position ), Rotation and Scale of the selection within SpriteUV’s texture that is going to be drawn. Think of these values as describing the location of a select box within the texture that are going to be copied and drawn as the texture. Here is a bad diagram to attempt to explain what’s happening.
The background is our SpriteUV texture. By default the UV.T is (0,0), meaning drawing will start from the bottom left. By default the UV.S values will be (1,1), meaning no scaling will occur. Using these defaults, when we draw our sprite, the entire image will be drawn.
Now consider the blue selection rectangle. This has a UV.T value of (0.3,0.3) and a UV.S value of (0.5,0.5) …. okay… my drawing to scale kind sucked, just imagine that the blue rectange was a quarter of the entire image size. These values mean that at position 0.3,0.3… or 30% right and 30% up from the origin in the bottom left, we start our selection. Due to our S(cale) value of (0.5,0.5) it means our selection size is half the height and half the width of the texture. In this example we are not making use of TR.R(otation).
Therefore, assuming the following diagram was to scale, with a Translation UV value of 0.3, 0.3 and Scale UV value of 0.5 and 0.5, when we draw our texture we will see:
And that is how you can use UV values to draw a portion of a sprite’s texture. You may notice that SpriteUV has a pair of properties, FlipU and FlipV. All these do is reverse the direction of the U or V coordinate, for example, flipping U would make (0,0) be at the bottom right of the image instead of the bottom left.
You can download the complete archive here. Obviously the Watchman logo is protected under copyright and cannot be used commercially in any way whatsover, period, ever. For real.


